Standing out in the market is important. And offering a competitive service and price are effective at capturing customer’s attention. But taking that attention and turning it into repeat clients with brand loyalty is critical to your long-term success. So let's...
6 Exercises To Create A Stronger You Today
We use on a regular basis with our clients and that we think are very valuable. These 6 exercises to create a stronger you today when worked routinely will have a measurable impact on your fitness. Read how to do each movement safely and check out the downloadable workouts at the end for a place to get started.
TABLE OF CONTENTS
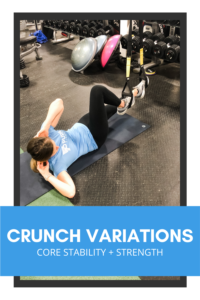
AB WHEEL
The ab wheel is almost a standard in our gym. Not that everyone “should” be able to do it, but that it is an example of core strength and stability. Performing the ab wheel correctly, pain free is a benchmark that we can measure core strength by. Again, we do NOT use it with everyone, but healthy individuals, especially look for improve athletic performance you better bet your bottom dollar we do.
If those individuals can give 15-20 exceptional ab wheel reps then we hit them with some progressions. Like putting a weight on your back or performing the reps from your toes. Both show a high level of core & shoulder strength & stability.
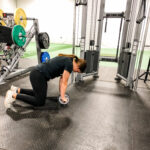
HOW TO PERFORM AN AB WHEEL
First off you are going to need to have an ab wheel. If you don’t skip over to your nearest store or order one up off of amazon (affiliate link). Next up is something for your knees. We have the stability pads (affiliate link) that we use at the gym, but if you don’t have one on hand you can use a towel or pillow. I would 10 for 10 recommend the stability pad, we use it for so many exercises from core to balance. But I am against having a bunch of stuff laying around – so make sure you have a place for it. Otherwise grab the pillow of your couch and get going.
STEPS FOR AN AB WHEEL
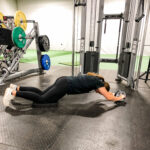
- Start on your knees with the ab wheel on the ground under your shoulders.
- Brace your core and push from your knees and hands to move the ab wheel forward.
- Once you have reached YOUR maximal range of motion pull the wheel back to the starting position by equally pulling in from your arms and hips.
WHAT TO AVOID WHEN DOING THE AB WHEEL
In no way is this an “entry level” core exercise. Most common mistake we see is continuing to perform this exercise incorrectly. The exerciser either creates an issue (pain) or exacerbates one. Make sure you are strong enough by doing plenty of core exercises with great form, to failure.
- Arching low back or sagging butt – this is an ab exercise, brace your core!
- Only moving your arms – your torso should come forward with your arms.
- Only moving your hips/torso – your arms should extend forward at the same time.
TIPS FOR THE AB WHEEL
- Control your pelvis. Arching in the low back is the number one cause of pain or discomfort with this exercise. It indicates that your abdominals are not staying engaged. Keeping your hips tucked can help you engage your low abdominals and prevent the low back from arching. But the more neutral spine you can stay the better.
- Equal Movement. We want to see your hips and shoulders extending simultaneously in both directions. The movement should be smooth and equal.
- Range of Motion. The end goal of this exercise is a full extension. However, that isn’t where you start. Most people will have to shorten their range of motion in order to keep their pelvis tucked/ back neutral and equal movement from the hips and shoulders.
CORE REGRESSION & PROGRESSION EXERCISES
With the ab wheel being an advanced core exercise you may need some other exercises to supplement. Try planks with upper body movements like shoulder taps and plank step-ups to work on strength in the end range of motion of an ab wheel. Sit-up variations on the decline bench or v-sit variations to work on hip flexor strength and low abdominals.
If you want to make the exercise hard you can work on angles out to the side, add a weight to your back or try from your toes. BUT we caution these moves unless you are truly doing 15-20 really high quality, full range of motion reps.
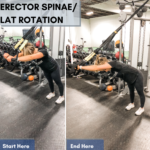
BENT OVER ROW
It may be a basic, simple, old exercise, but everyone should be familiar with a bent over row. And if you already know the bent over row, how many other back exercises can you think of? Hopefully 2 or 3 times as many chest exercises.
Training your back muscles should 100% be a priority during your workouts. We live in a forward dominant world – meaning life we do most of our activities in the front of our body. Exercise should work to maintain balance in our bodies, which means we need to do more back work to manage the impact of our lifestyle habits.
HOW TO PERFORM A BENT OVER ROW
Let’s start by recognizing the posture of a bent over row. It is important to understand that this bent over posture puts a large load on the core – back and abdominals. Maintaining core engagement while in this posture will help maximize your results and keep your back pain free.
Second piece about posture is that the more parallel to the ground you are able to get your chest the better. That is from the perspective that we want to load more of the mid back and less of the upper back. Of course, there will be times you want to load the upper back, but that’s not right now.
An added bonus for the bent over row is that it requires your lower body to work isometrically to hold the hip hinge posture.
Finally, because I can’t say the word posture enough … the bent over row will help improve your posture. Any back exercise, done properly, will help your posture. You will notice you stand up straighter, walk taller and have a more elongated appearance in the mirror. But, that will only happen by putting in the work and following a regular, consistent program.
STEPS FOR A BENT OVER ROW
- Holding weights at your hips, set your feet in a comfortable stance. Try to go no wider than shoulder width.
- Brace your core and slightly bend your knees.
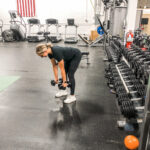
- Hinge at your hips, keeping your core tight and your spine neutral as you lower your chest to parallel with the ground.
- Once in position the weights should hang directly below your shoulders (see picture).
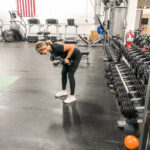
- Pinch your shoulder blades together and “row” or pull the weights toward your chest.
- Control the weights back down to the starting position and repeat.
WHAT TO AVOID WHEN DOING A BENT OVER ROW
- Arching & rounding of the spine/back.
- Curling of the wrists.
- Lifting chest out of parallel posture.
TIPS FOR A BENT OVER ROW
- Focus on your shoulder blades, not the distance your weight travel. Retracting or pinching your shoulder blades as the first motion in a row is critical to recruiting your back muscles over your biceps. Try to “grab a pencil” between your shoulder blades to help visualize your shoulder blades retracting/pinching.
- In a bent over, or hip hinged, posture you are increasing the demand on your trunk. Keeping a neutral spine and core engaged the entire time will keep your low back from becoming over worked. Work to keep your back parallel to the ground the entire time.
- Keep your core braced and spine neutral through the entire movement. Tendency is to allow your back to arch as you pull the weight to your chest and round as you lower it towards the ground. Fight that tendency!
- Far too often we see extension or arching in the mid-to-low back upon movement. This will cause irritation of the low back and decrease the use of your abdominals. Squeeze your core!
- Change your grip and arm positioning to target your back differently. I like wide bent over rows with a palm down position and an underhand grip bent over row the best.
OTHER BACK EXERCISES AND BENT OVER ROW VARIATIONS
There are a significant amount of variations to a bent over row. Too many to name, but you can add a stability component and stand on single leg, you can make it unilateral and perform it single arm. You can do it from a plank position to increase the challenge on your core. Make your choice based on your ability to perform quality reps and the end goal (or adaptation) you are trying to achieve.
A few of the common exercises I use to train my back are pull-ups because there is no better exercise for your back. You may need to start with a modification (heavy seated row or lat pull down) or assistance, but being able to do pull-ups is an excellent measurement of back strength and overall fitness.
I also love reverse fly and bent over Ys because they effectively target the smaller posterior muscles of the shoulder that keep your shoulders back. Which translates to the appearance of walking tall or walking with confidence as you consistently hold your shoulders back, keeping your chest upright and open.
WALL SIT
The wall sit is an isometric exercise. If you are wondering what in the heck isometric is, or if it is even English, let me explain. Isometric is essentially a muscle contraction that produces no movement. In fact, you are likely doing isometric work in the form of a plank or a v-sit hold.
The biggest reason you should be doing isometric exercises is for the stability benefits. Whether you are a teenage athlete, avid runner or in the aging population stability is your friend. It should be your best friend.
You will also experience an improvement in muscle endurance by regularly incorporating isometric exercises. This is once again great for athletes, injury prevention and the aging body.
How to Perform A Wall Sit isometric exercise
- Find yourself a wall.
- Sit against it.
It really is that simple. However, we have some guidelines to follow or work towards.
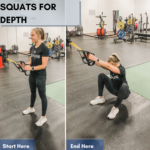
- Try to get 90 degrees of flexion at your hips and knees. This depth mirrors a squat depth and has a direction translation to muscle fiber recruitment for proper muscle firing within the movement.
- Keeping your feet around hip width and knees over your ankles. We want to avoid excessive internal rotation, letting our knees knock in, and rolling onto the side of our foot, picking up our big toe, and lifting our heels off the ground. Focus on a consistent foot contact with the ground.
- Maintain contact with the wall at your head, shoulders, back and butt by bracing your upper body into the wall. This will make your wall sit more of a total body exercise and help the neurological connection between your lower and upper body in the squatting pattern.
What to Avoid when doing a Wall Sit
- Lifting your heels off the ground (for a standard variation)
- Letting your knees cave in
- Rolling on to the outside of your foot
- Leaning forward and rest your elbows on your thighs
Other Isometric Exercises and wall sit variations
A plank is a great upper body isometric exercise, but the sky is the limit. You can take any muscle contraction and make it isometric. Just think of an exercise you like. Here is a common one – a bicep curl. Simply hold the weight with your elbow(s) at 90 degrees. You can time the exercise, or do it while holding a lunge for an isometric lower body burn too. Alternately you could be doing a full reverse lunge and working the concentric and eccentric phase.
Here are a few of my favorite isometric exercises:
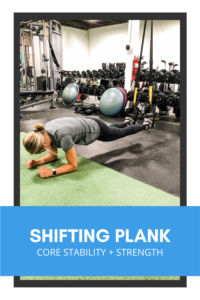
- Plank Variations: movement in the lower body like knee drives, pikes, scissors, kick throughs, or change the surface of the plank to be on a Bosu Ball, medicine ball, stability ball.
- Wall Sit Variations: add movement in your upper body with resistance bands or free weights, hold a medicine ball between your knees, march or wear a band and use your glutes to drive into the band.
- Upper Body Variations: chin up hold, flexed arm hold, single arm hold and perform reps with the other arm (ex – bench press with one arm locked out at the top).
- Lower Body Variations: split squat position, hold the bottom position of a RDL, glute bridge hold (optional single leg), calf raise hold, single leg squat with alternating toe tap.
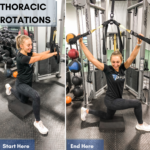
HIGH TO LOW CORE ROTATOR
The high to low core rotator is functional rotational exercise targeting your core, including shoulders and hips. We consider it one of the best rotational exercises because of how effective it is at targeting specific phases of muscle contraction and focused movement patterns. The variations you can take from plane of movement, stance, unilateral vs. bilateral … they feel limitless. This really allows us to follow the principal of variability to increase stability throughout the core.
It is important to note that your core as we refer to it includes abdominals, posterior muscles of the trunk, glutes and shoulders. Additionally, if you focus on the abdominal muscles you will find that rotation requires multiple muscles, not just one like some ab exercises. The high to low core rotator is trunk rotation with flexion meaning we are getting obliques, transverse abdominis and rectus abdominis to name a few.
HOW TO PERFORM A HIGH TO LOW CORE ROTATOR
We love to use core rotator variations in our programming because they scale easily to meet the individual where they are, they are highly functional and the amount of variations make them applicable to everything from sports performance to injury prevention/rehabilitation.
The high to low core rotator we would consider a starting point. A basic, entry level movement that can provide us with feedback on client abilities and challenge a client’s strength, proprioception and range of motion.
-
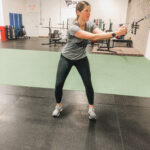
- Starting Position
-
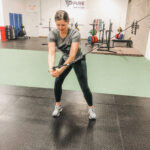
- Middle Position
-
- Ending Position
STEPS FOR A HIGH TO LOW CORE ROTATOR
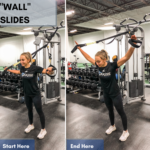
- Set your cable attachment at the top of the pulley machine so that it is above your head.
- Start perpendicular to and offset from the cable machine so that the machine is slightly in front of you. You can start on facing either side, as long as the cable machine is slightly in front of you.
- Hold on to a single handle with the inside hand, or the hand closest to the cable machine. Wrap the opposite hand around the top of that hand. And take a few steps away, from the cable so the weights are not resting.
- Set your feet shoulder width apart and bend your knees, pushing your weight into the midfoot – heel, to load your hips and glutes.
- Brace your core by squeezing your abdominals, rotate from your hips and shoulders bringing the handle across your body to the opposite hip.
- Control the cable and your arms as your rotate back to the starting position, following the exact same path.
- Perform 10 reps on one side and then switch sides.
WHAT TO AVOID WHEN DOING A HIGH TO LOW CORE ROTATOR
The cable should follow an angled path from high to low (hence the name). If you do not bring your arms down on an angle as you come across your body line the cable will hit you in the face or throat.
Your back should remain neutral as you rotate through this movement. Any extending or arching in your back will cause discomfort. This exercise is designed to use flexion and rotation, flex and squeeze your abs!
Keep your weight even between your left and right foot. Allowing your weight to shift or leaning to the side can cause you to loose balance.
HOW TO PROGRESS A HIGH TO LOW CORE ROTATOR
We have mentioned that there are almost limitless possibilities for a high to low core rotator, right? Well that makes it hard to tell you how to progress it. Here is our best advice:
- Change the height – as you bring the cable pulley attachment down towards your chest, hips and then knees the exercise becomes increasingly more difficult. You should not be doing the same weight the entire time. Gravity isn’t helping you as you lower the cable. Which means you are now fighting gravity. Of course we don’t call these high to low core rotators anymore, but they are certainly harder variations.
- Change your stance – you can move your feet around to work on different angles and in various stability situations like kneeling, half kneeling, single leg and more.
- Change the grip – switching what hand is on the bottom and single arm versus double arm will change the difficulty and the demand of the exercise.
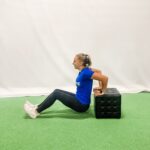
TRICEP DIP
Your triceps, or the muscle located on the back of your arms, are used more than you might think. The triceps muscle is responsible for straightening your elbow, which we do all day long. Like pushing yourself out of bed in the morning or off the ground, closing doors or cabinets or simply reaching for an item by straightening your arm.
We also use them in a lot of activities like push-ups, shoulder presses, chest presses, planks, swimming, volleyball, baseball and more. Just think of anytime you straighten your elbow to keep it straightened.
It is important to note that the triceps muscle has three heads. (An easy easy way to remember that is tri means three.) Training your triceps in a variety of movement patterns is needed to effectively target all three.
HOW TO PERFORM A TRICEP DIP
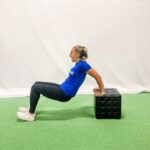
- Sit on the edge of a elevated flat surface with your hands resting, palms down on the surface.
- You can use any stable surface that allows your feet to touch the ground. Think bench, box, chair, stair, coffee table, etc.
- Push through your hands and lift your butt off the surface while you walk your feet slightly away from you.
- The hardest position is with your legs extended straight in front of you.
- Keep in mind your hips should stay close to the surface you are using.
- Bend at your elbows and lower your hips towards the ground while keeping your chest upright and open.
- Aim for a depth of 90 degrees at the elbows IF there is no shoulder discomfort and you can maintain good form.
- Drive through your hands and straighten your elbows to bring you back up to the starting position.
- Repeat for reps.
WHAT TO AVOID WHEN PERFORMING A TRICEP DIP
- Minimal elbow bend – your triceps are responsible for extension at your elbow (straightening). The more intention you can put into bending your elbows to achieve the needed range of motion the more work you can put into your triceps.
- Hips too far from surface – the further you allow your hips to drift away from the surface (box, bench, etc.) the more form challenges you will encounter. It will be harder to focus your intentions on bending at the elbow, there will likely be some shoulder discomfort, and your range of motion will change dramatically.
- Chest rounding forward – the round of your shoulders will change the range of motion, which will change the muscles used and the load you feel in your triceps. Focus on keeping your chest upright and open.
Luckily all there of these pieces of advice work synergistically. If you focus on bending at the elbows you will have to keep your hips closer to the surface you are using and keep your chest upright. If you keep your hips closer to the surface you will be more inclined to bend at the elbows and more capable of keeping your chest upright. And, finally, if you keep your chest upright you will be able to keep your hips closer to the surface and bend at the elbows!
HOW TO PROGRESS A TRICEP DIP
Make sure you have mastered the straight leg tricep dip before moving on to a harder version. If you have been doing knees bent, straighten your legs for a bigger tricep load. This is because the force arm (your legs) is longer as you straighten your leg. Putting more load into your triceps.
If you can check straight leg tricep dip off the list check out these options:
- Add a weight to the top of your thighs.
- Elevate your feet onto another box, bench or chair.
- Incorporate instability at your feet or hands by using a BOSU ball or TRX
OTHER TRICEP EXERCISES
- Tricep Push-Up
- Skull Crusher
- Laying OH Extension
- Standing Tricep Extension
- Sklz Single Arm Extension
- Narrow Floor Chest Press
BAND WALKS
Our training philosophy starts with establishing range of motion (ROM), building stability within ROM and then building strength and power. We follow this philosophy with all of our clients and for all joints. We use band walks to build and maintain stability at the hips.
HOW TO DO BAND WALKS
Band walks are done with a small circular band placed anywhere from the upper thighs to the ankles. This placement helps activate the muscles of your hip, building stability. The lower on the leg you place your band the hard the exercise will be. You can also get various levels of resistance which may change where you place the band.
I love to use the hip circle for myself and my clients It is a pretty great investment for $20. Shop here in this affiliate link.
Other factors like injury, orthopedic limitations or difficulty engaging the right muscles will dictate where you should place the band.
Two most common band walks are lateral and forward/backward, sometimes called monster walks.
- Select the location of your band and get it into place.
- For lateral band walks you will step sideways and for Monster walks you will step forwards. In both situations you are trying to maintain tension on the band every time your trail leg steps in. This means you are not allowing the band to pull your leg in, rather you are resisting that force.
- You continue to taking steps until you reach a desired location or rep count. I usually work my clients in sets of 20 in one direction. For monster walks my clients would walk forward 20 steps the backward 20 steps to the same starting position.
WHAT TO AVOID WHEN DOING BAND WALKS
One of the most common is an inward rotation or caving of the knees. The intention is for us to drive against the band activating our hip muscles. If we allow our knees to inwardly rotate or cave in we are being controlled by the band. Which is, generally speaking, a no-no in the training world.
You also want to avoid any back pain while doing band walks. Back pain can occur when you are straining against the band and moving into poor form to achieve movement. For example, if you are doing a glute bridge with the band on and experiencing back discomfort you are likely over extending (or arching) in your low back. Keeping a neutral spine and tight core while using the hip circle is necessary to get the most out of the exercise.
FAVORITE BANDED EXERCISES
Banded exercises are great for improving hip stability and good hip stability is impacted by more than external rotation and the glute muscles. There are a lot of supporting, stabilizing muscles of the hip including muscles of the inner thigh like adductors. While we use the hip circle to build hip stability we also incorporate other exercises designed to strengthen the muscles of internal rotation to keep the hip balanced.
- Band Walk Variations
- Squat Variations
- Plank Variations
- Glute Bridge Variations
- Pulsing Wall Sit
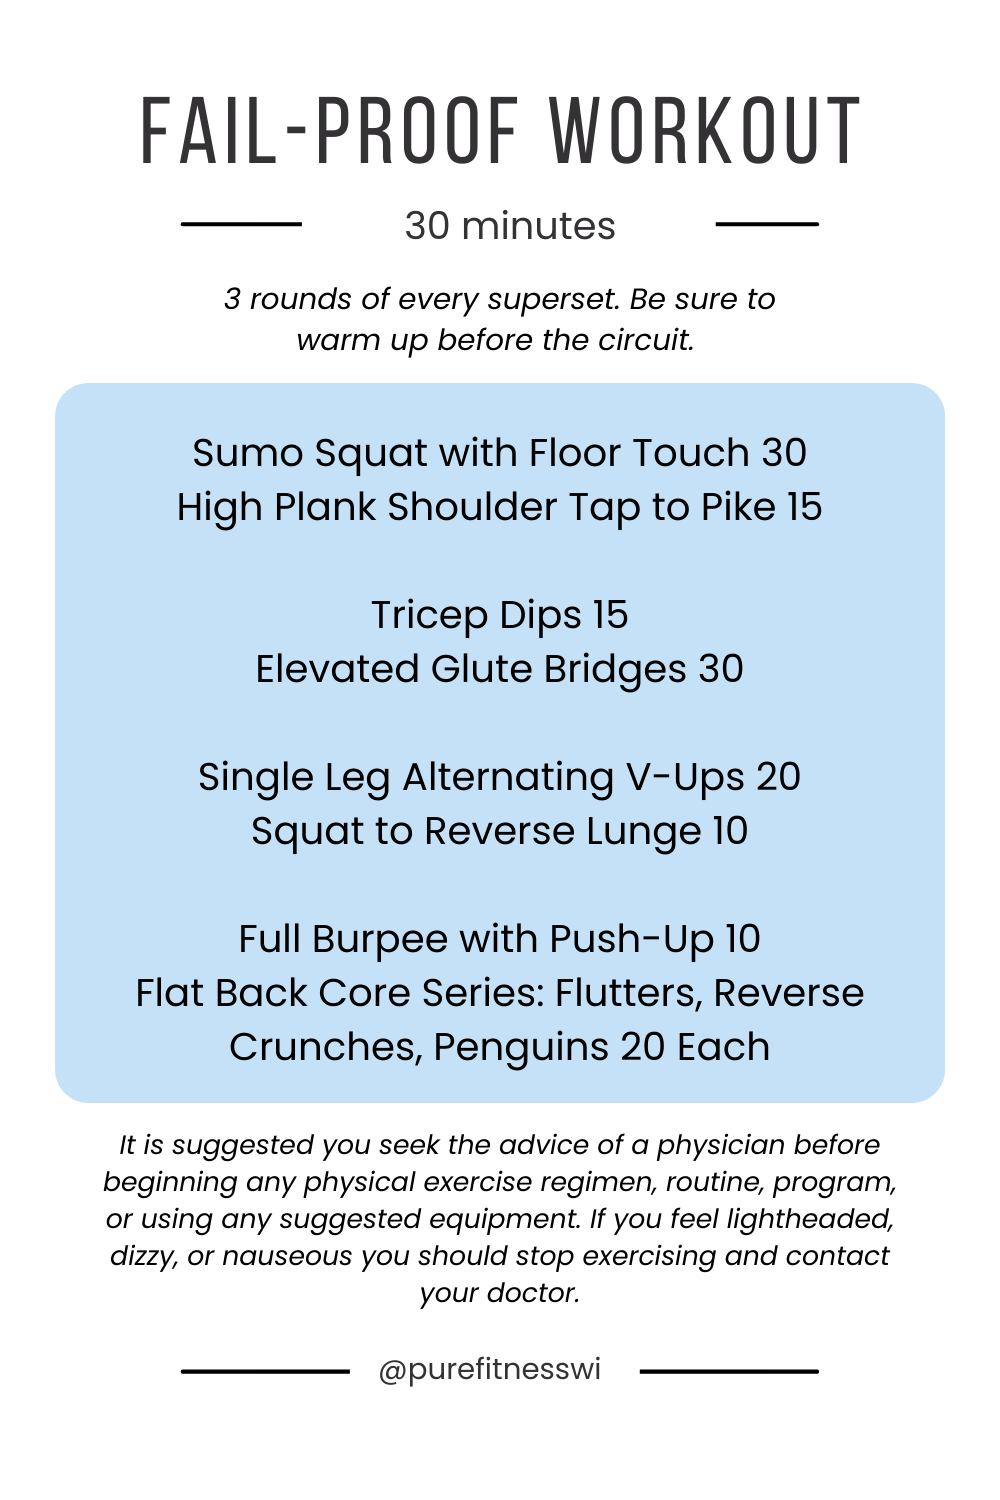
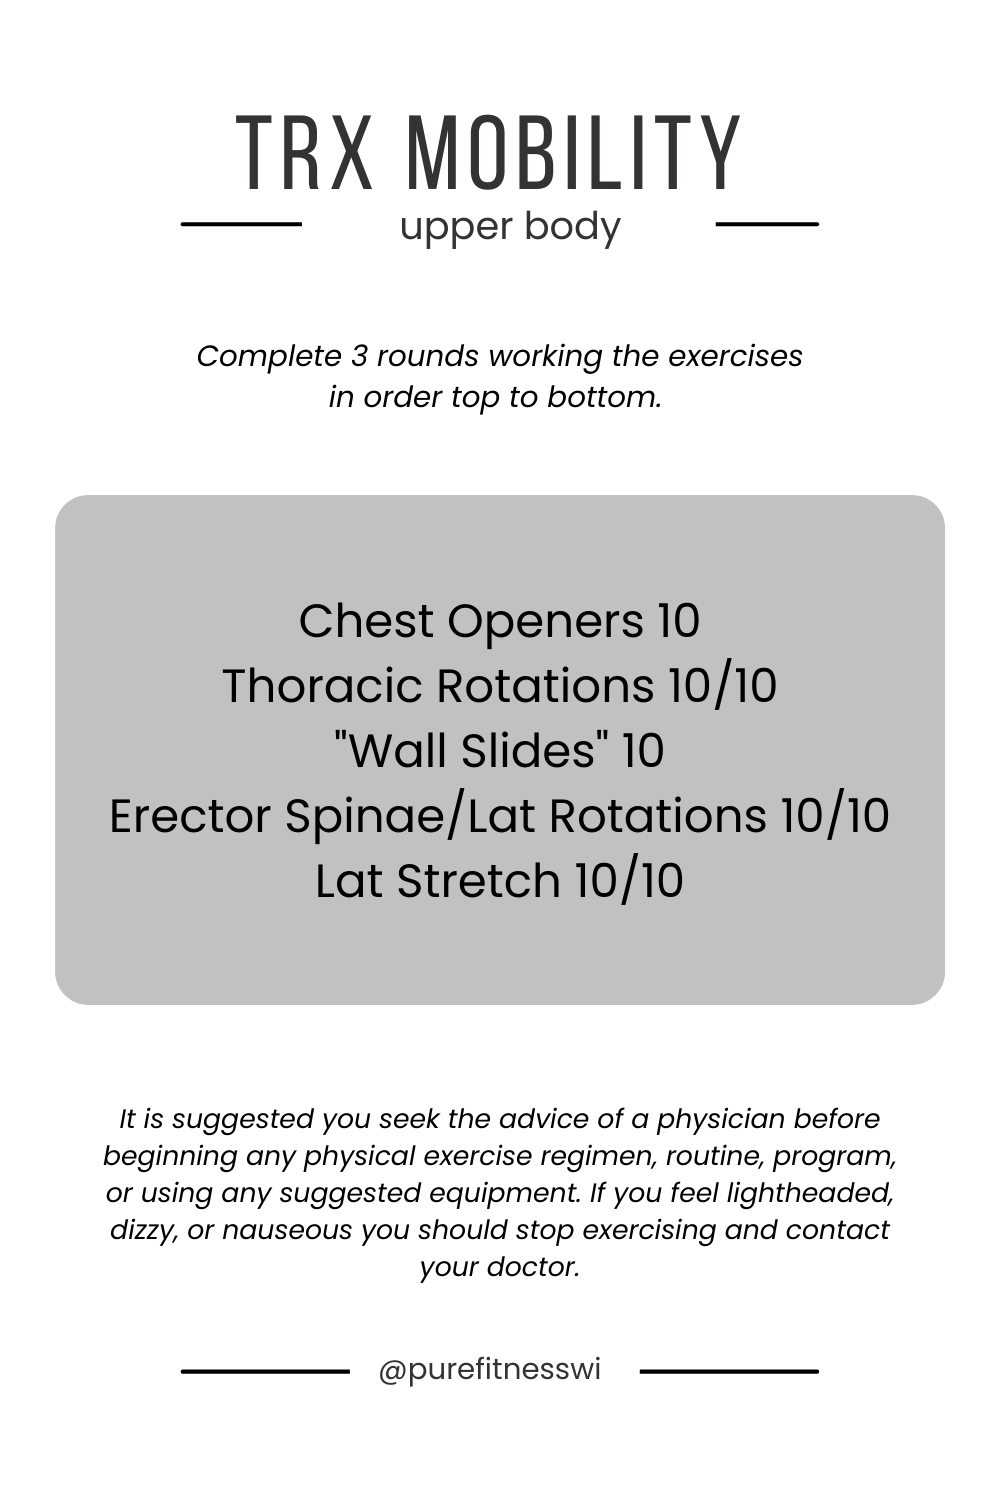
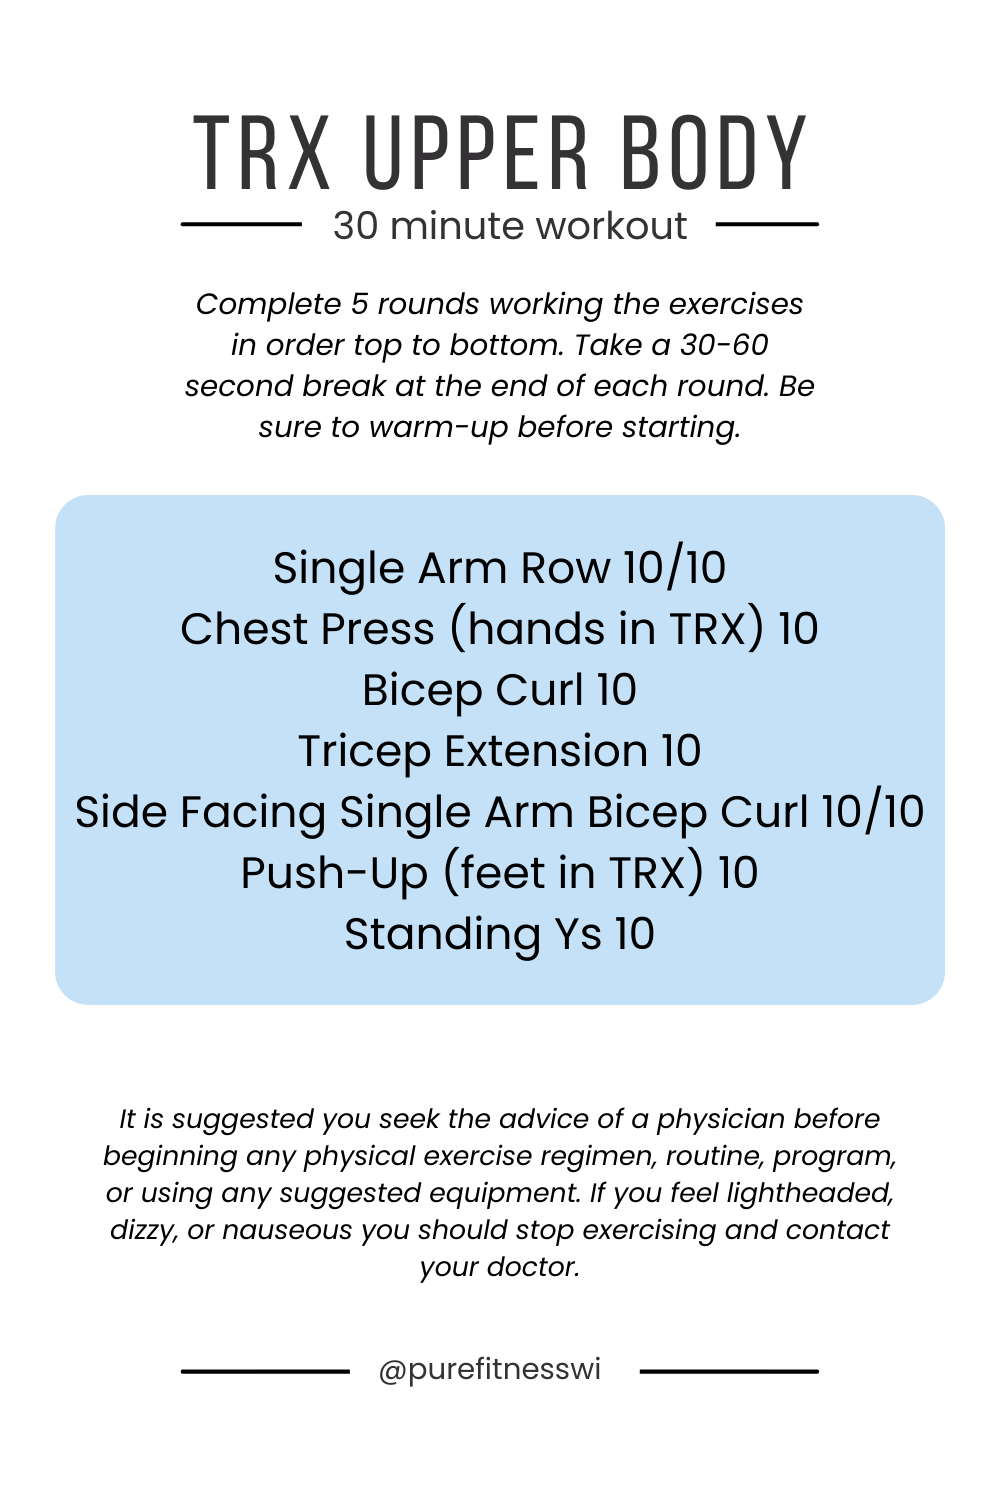
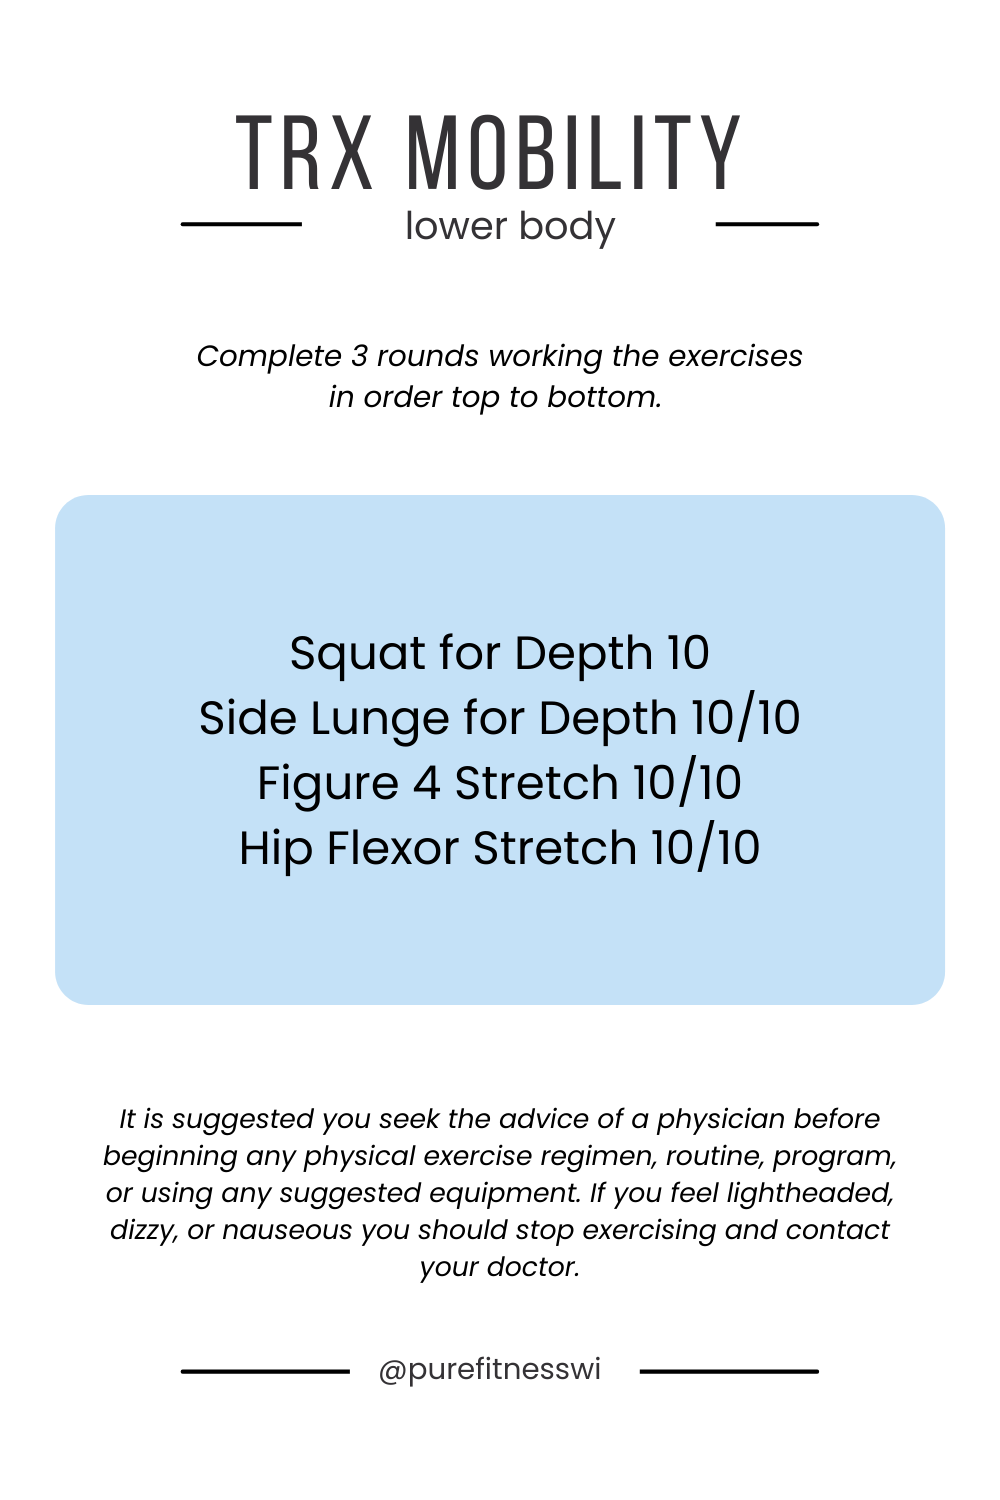
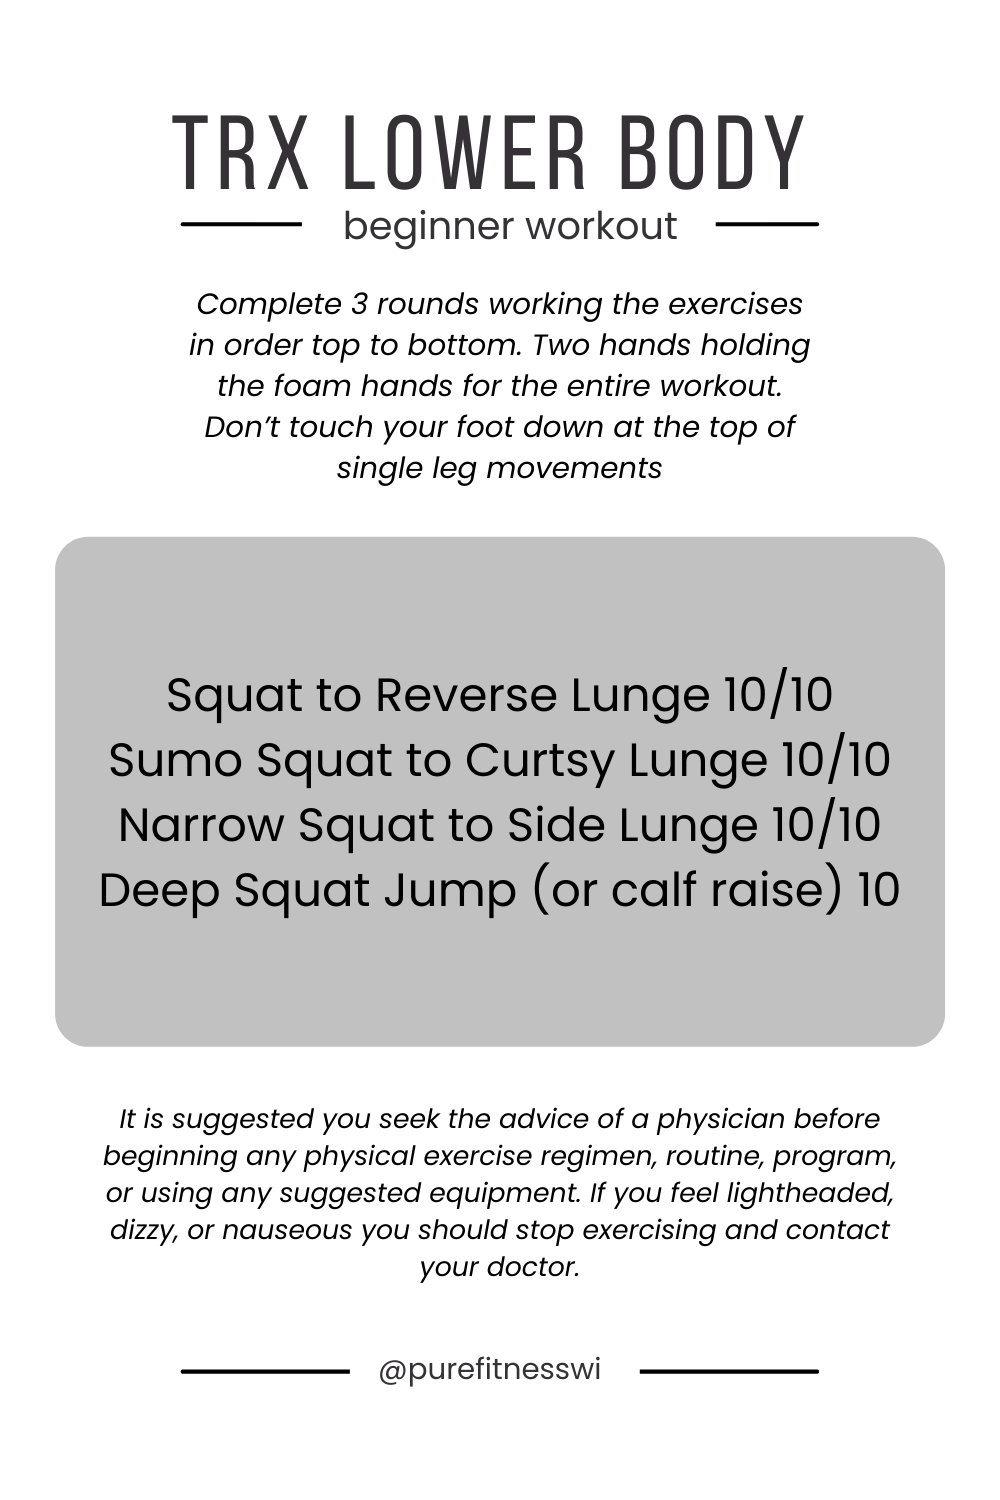
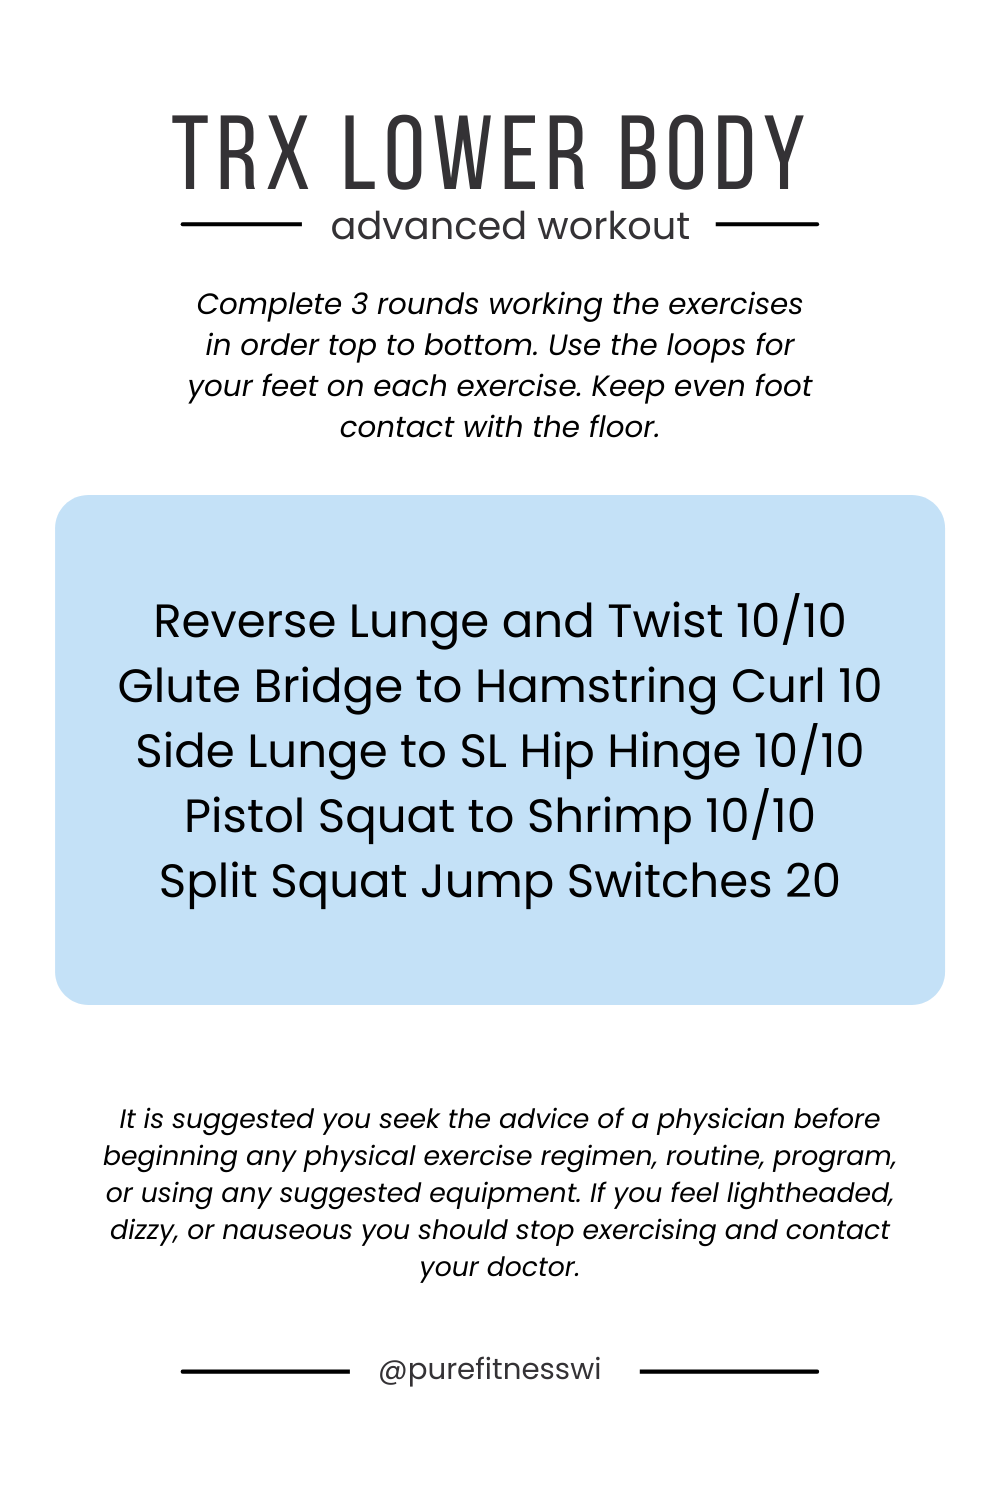
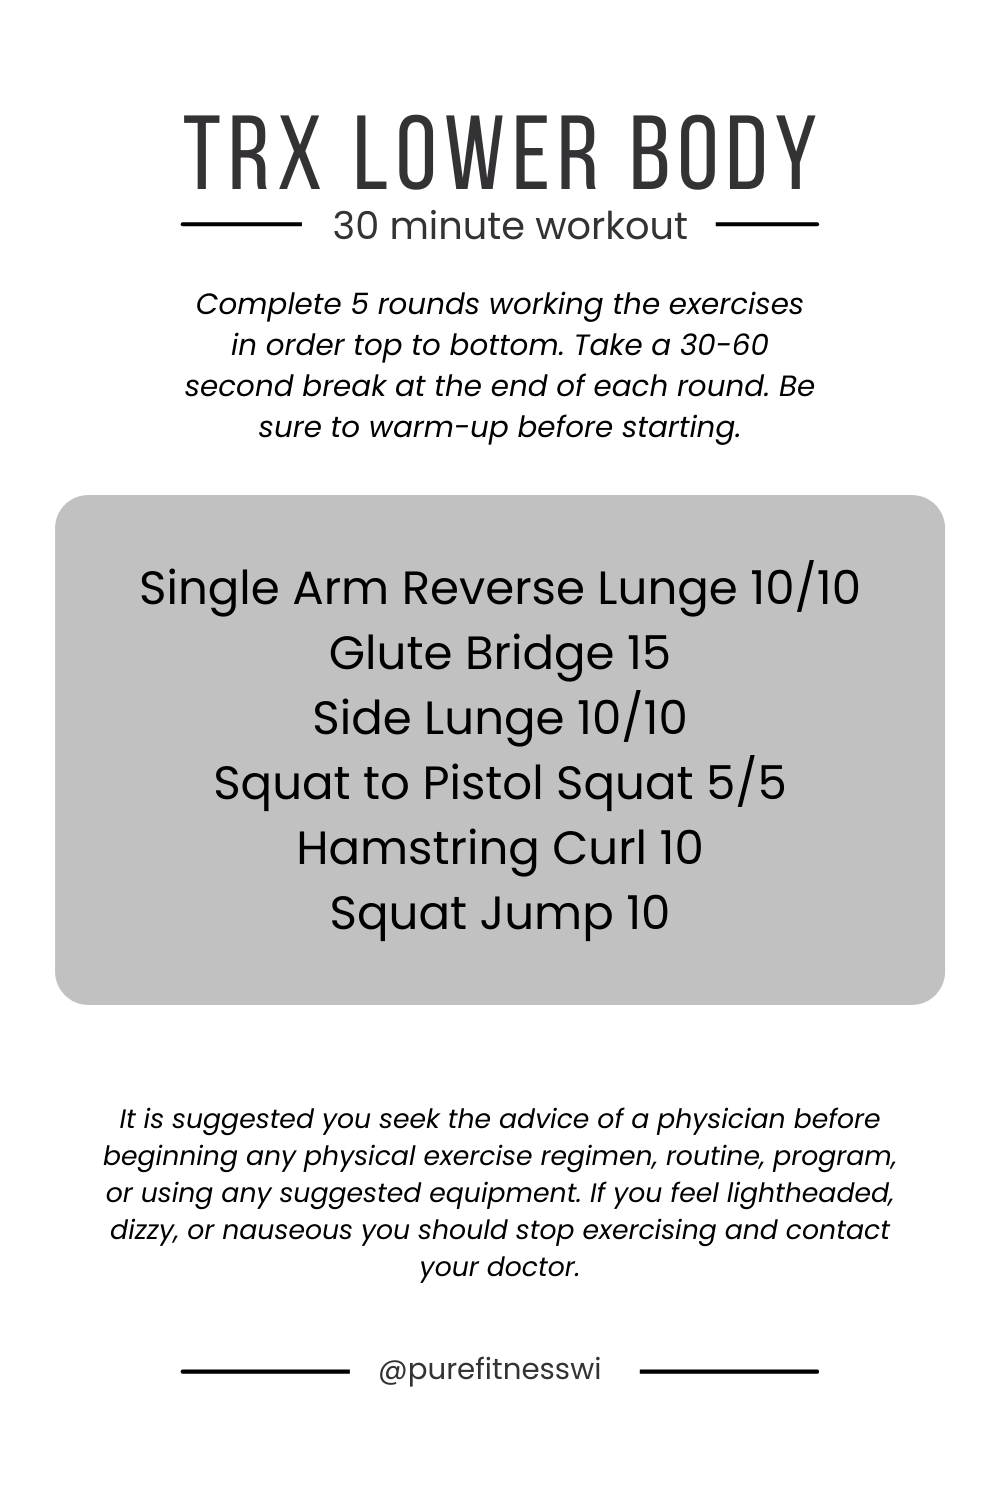
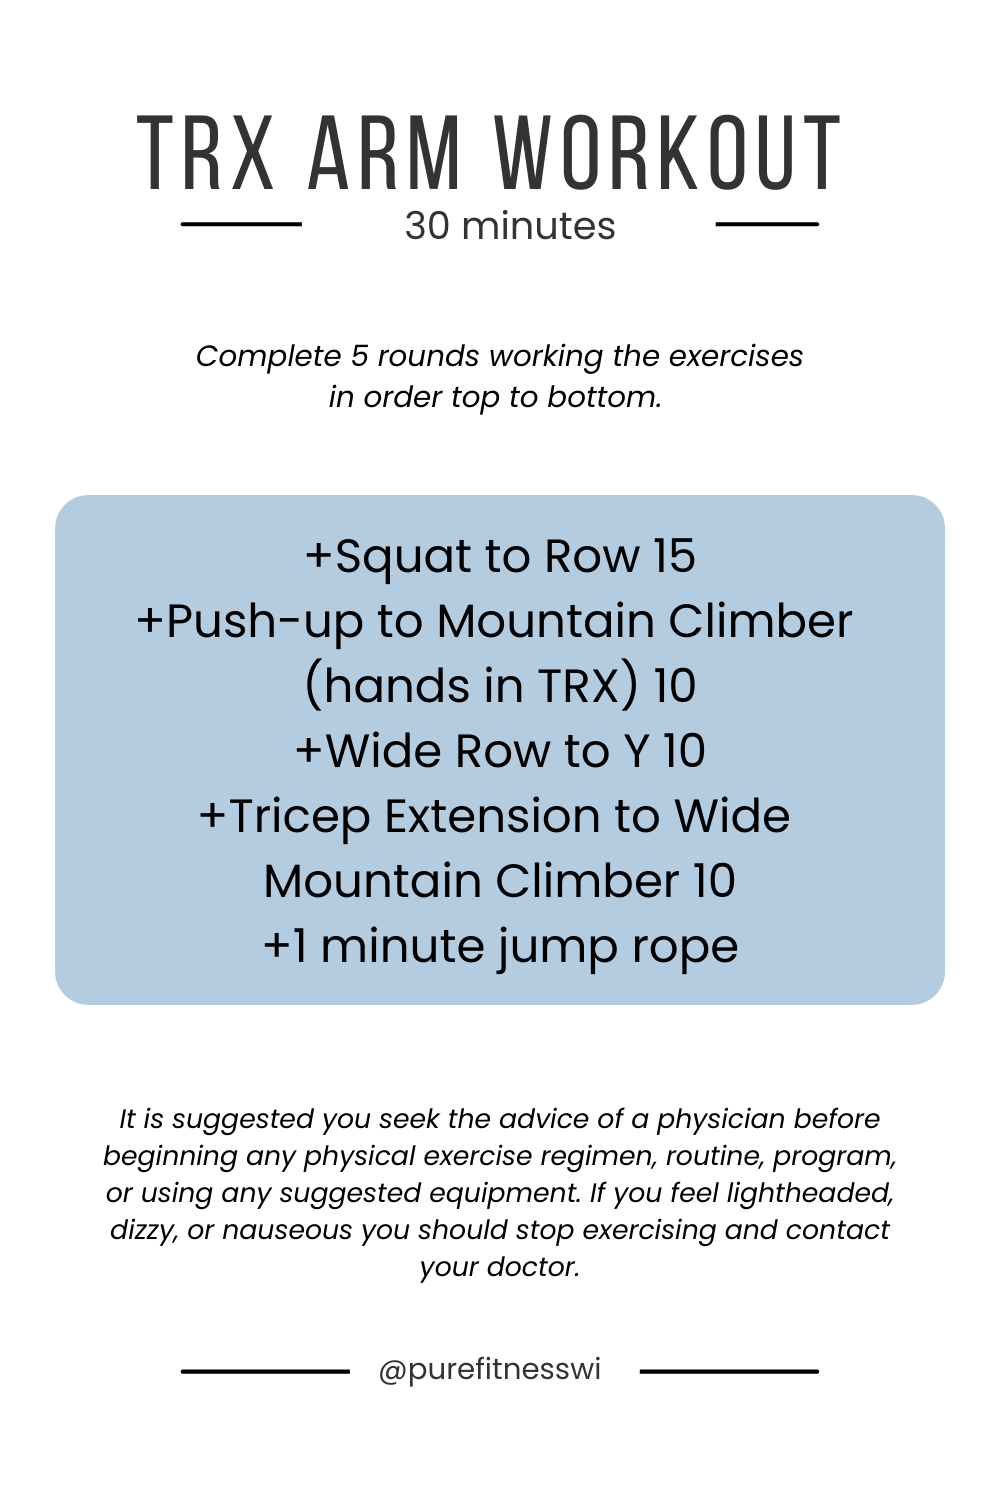
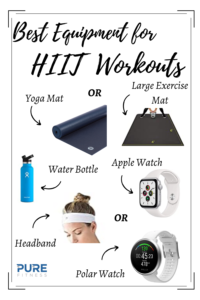
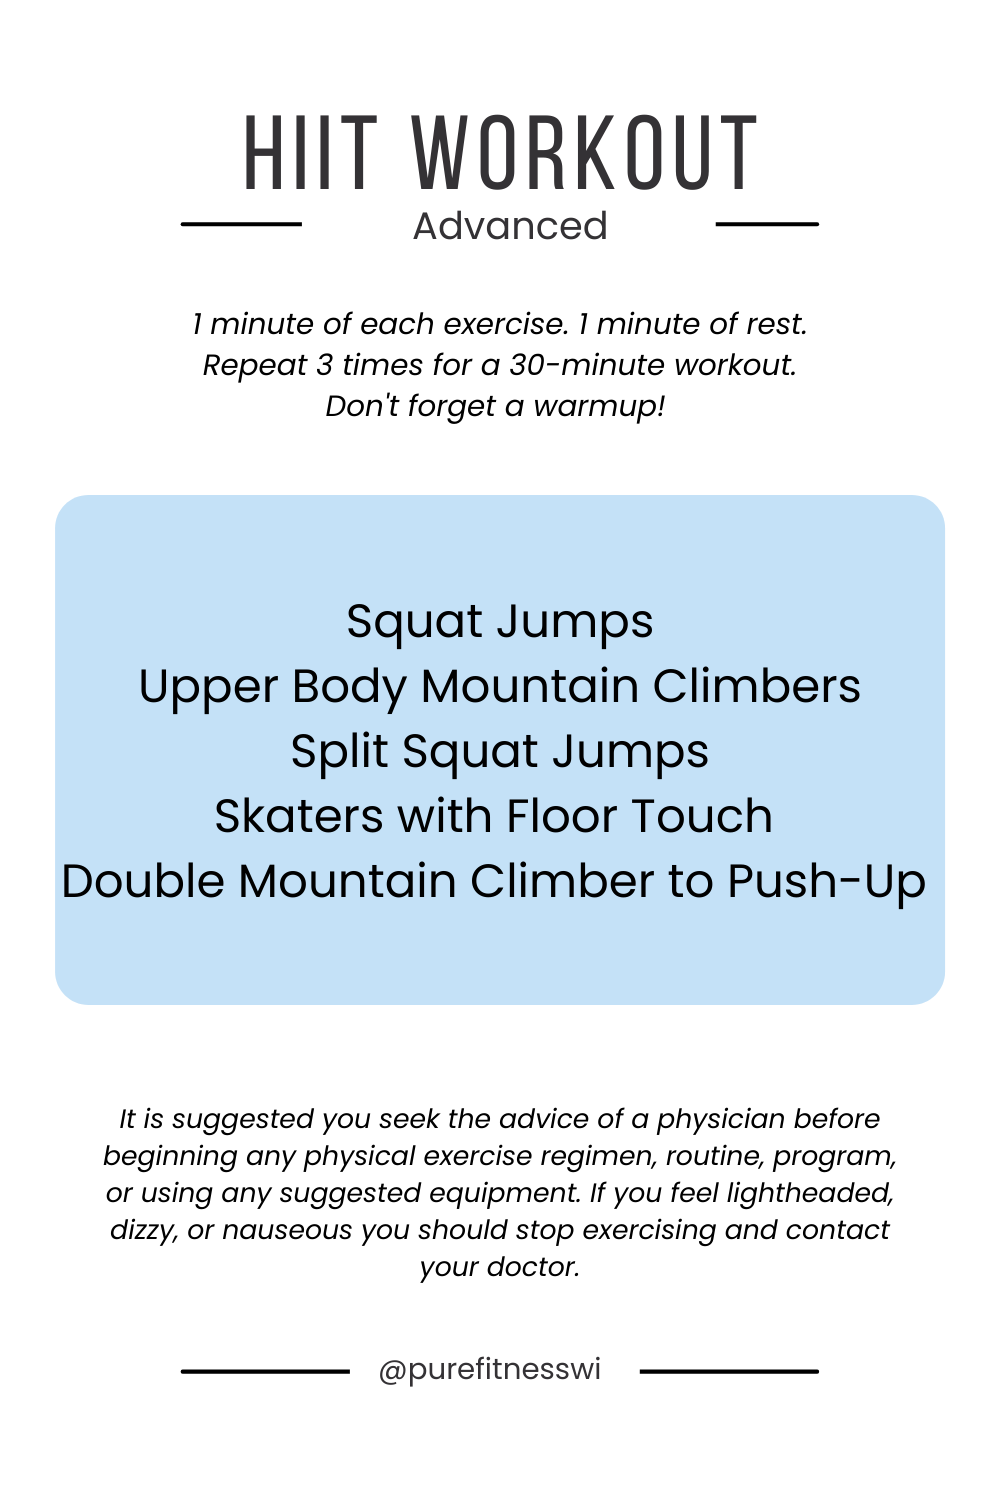
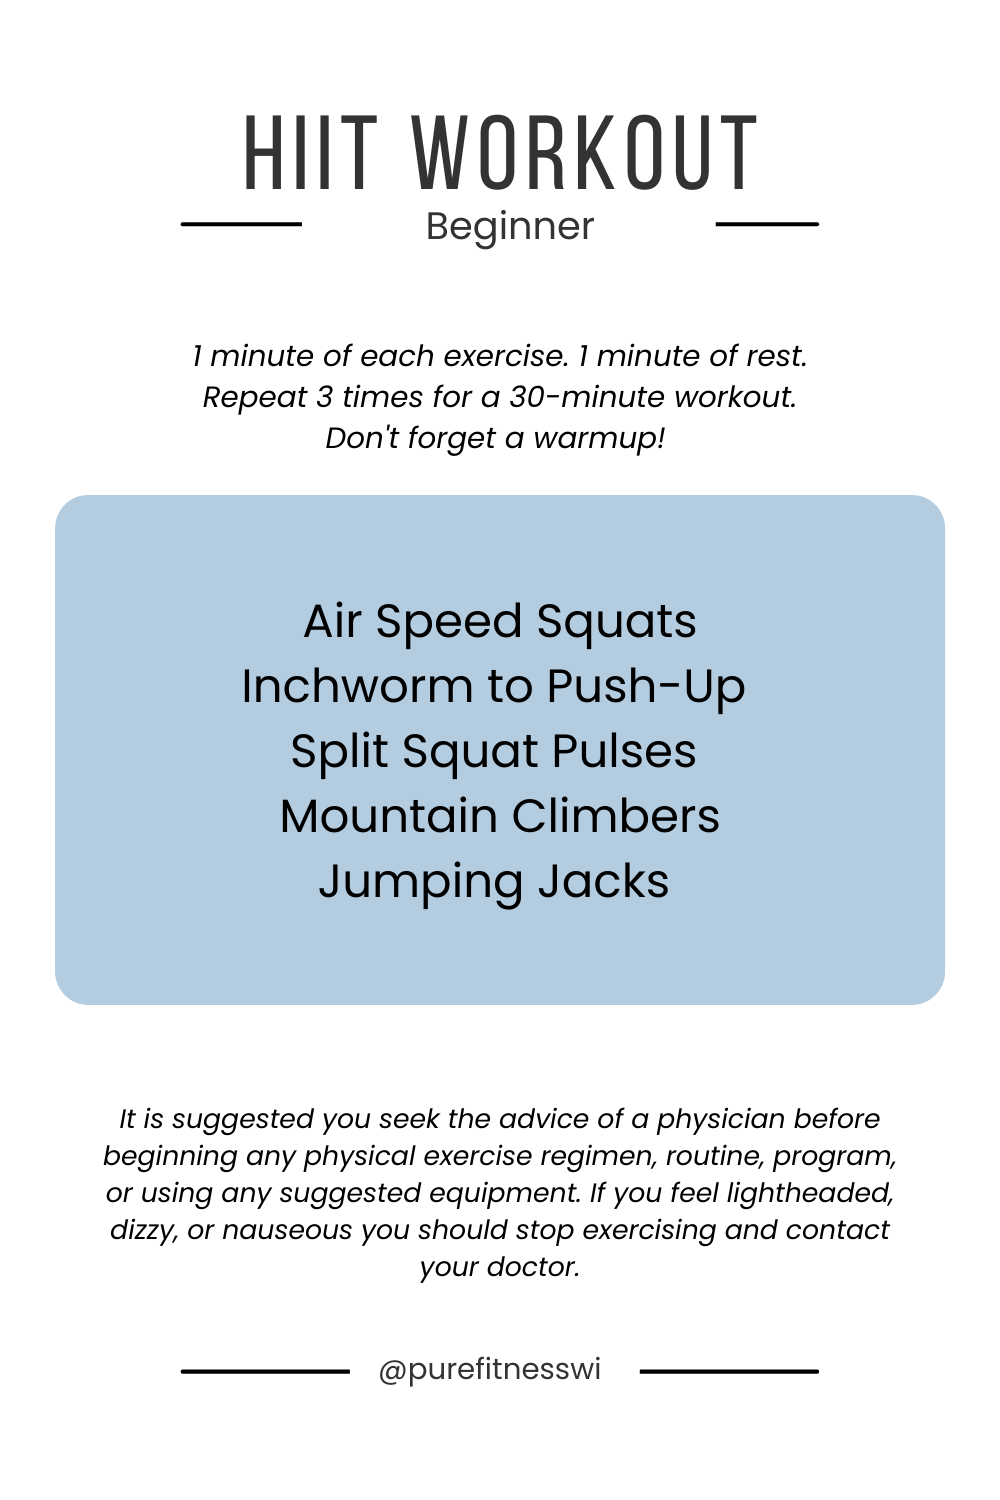
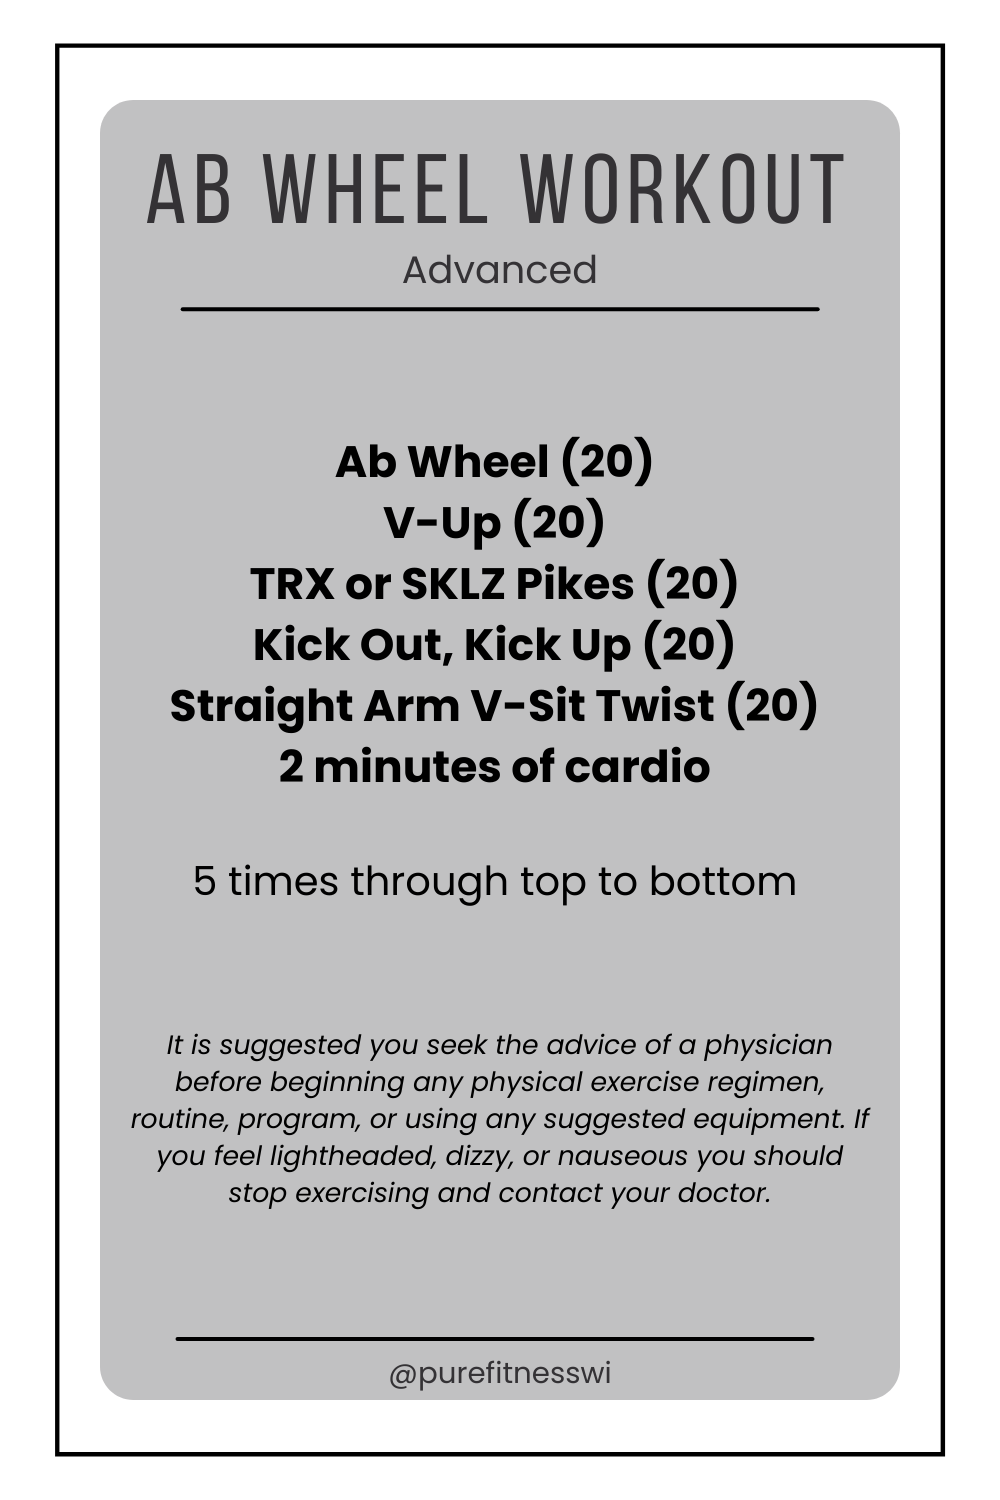
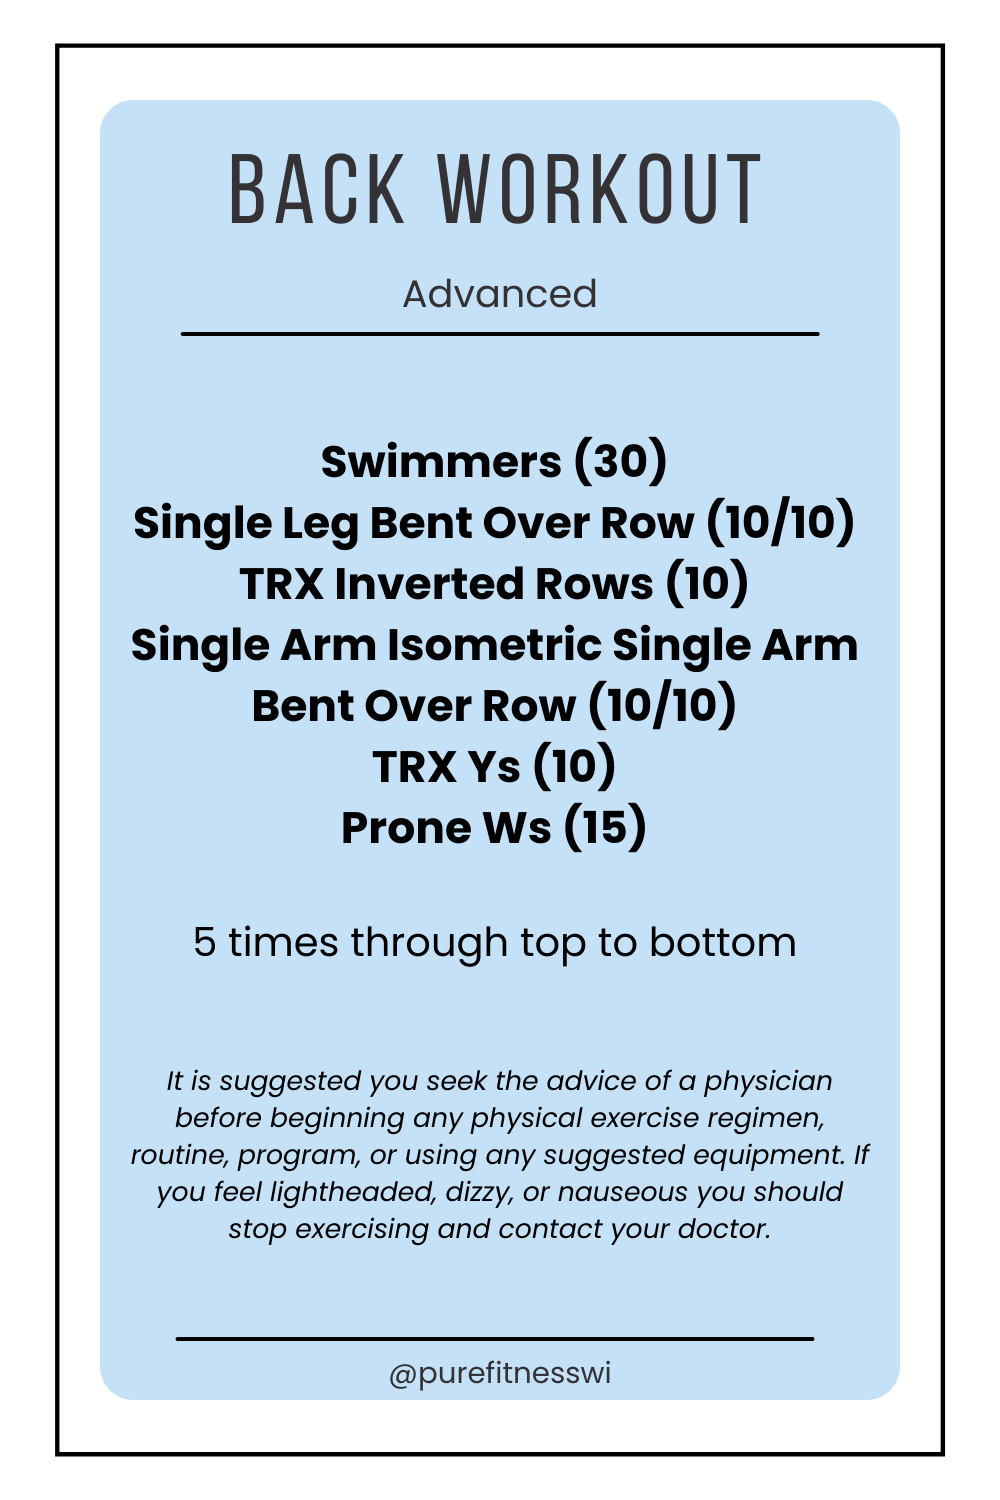
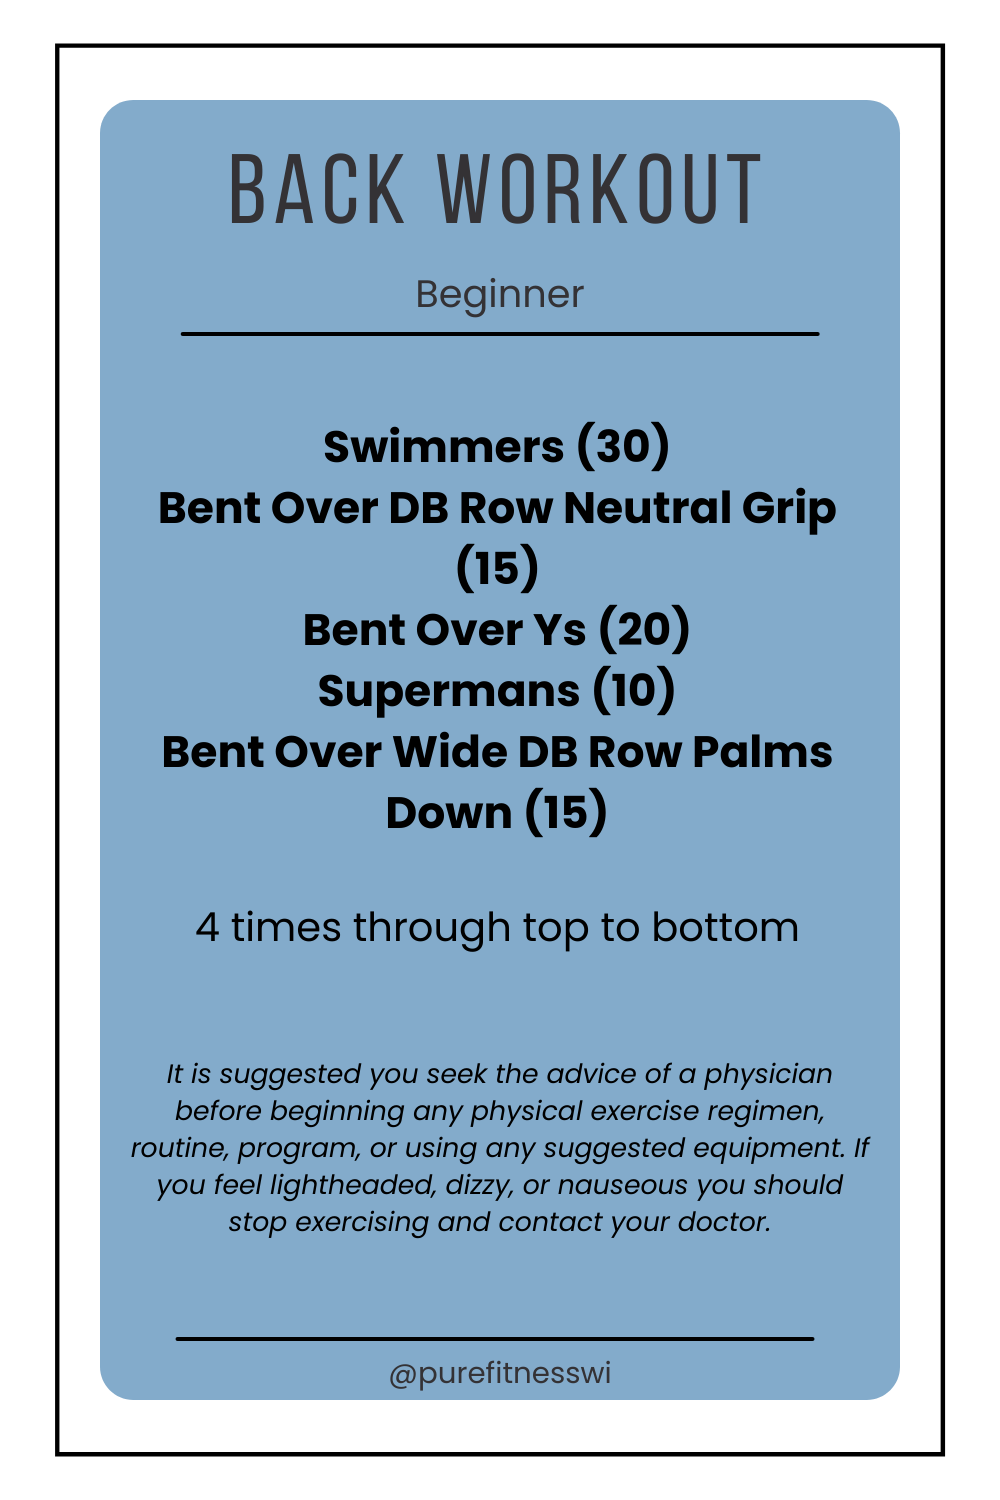
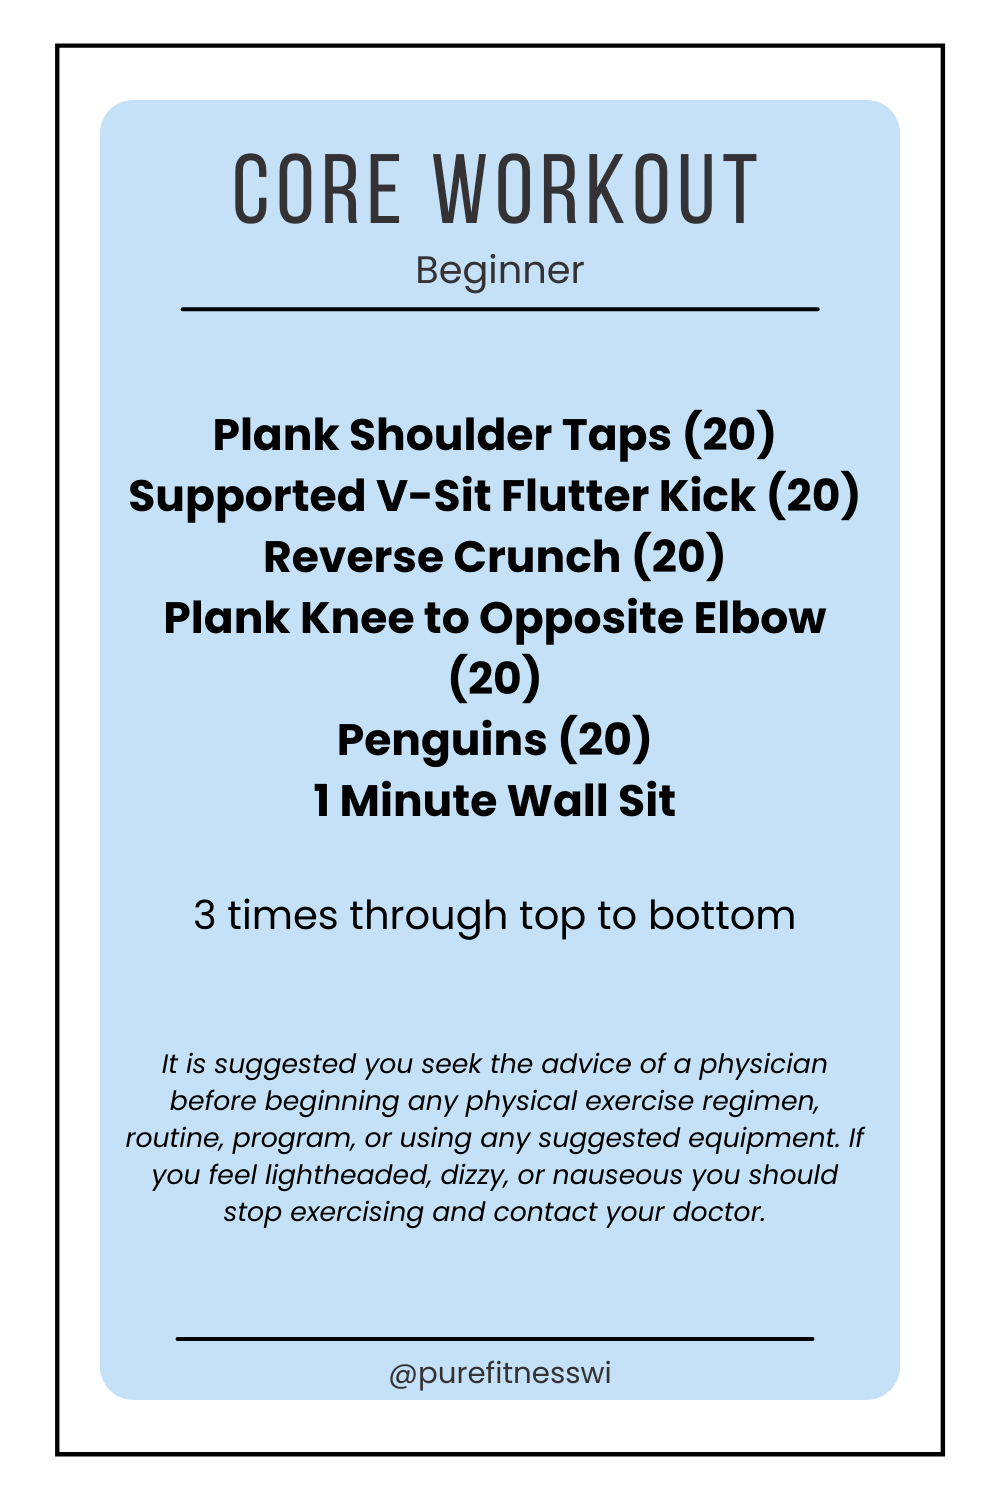
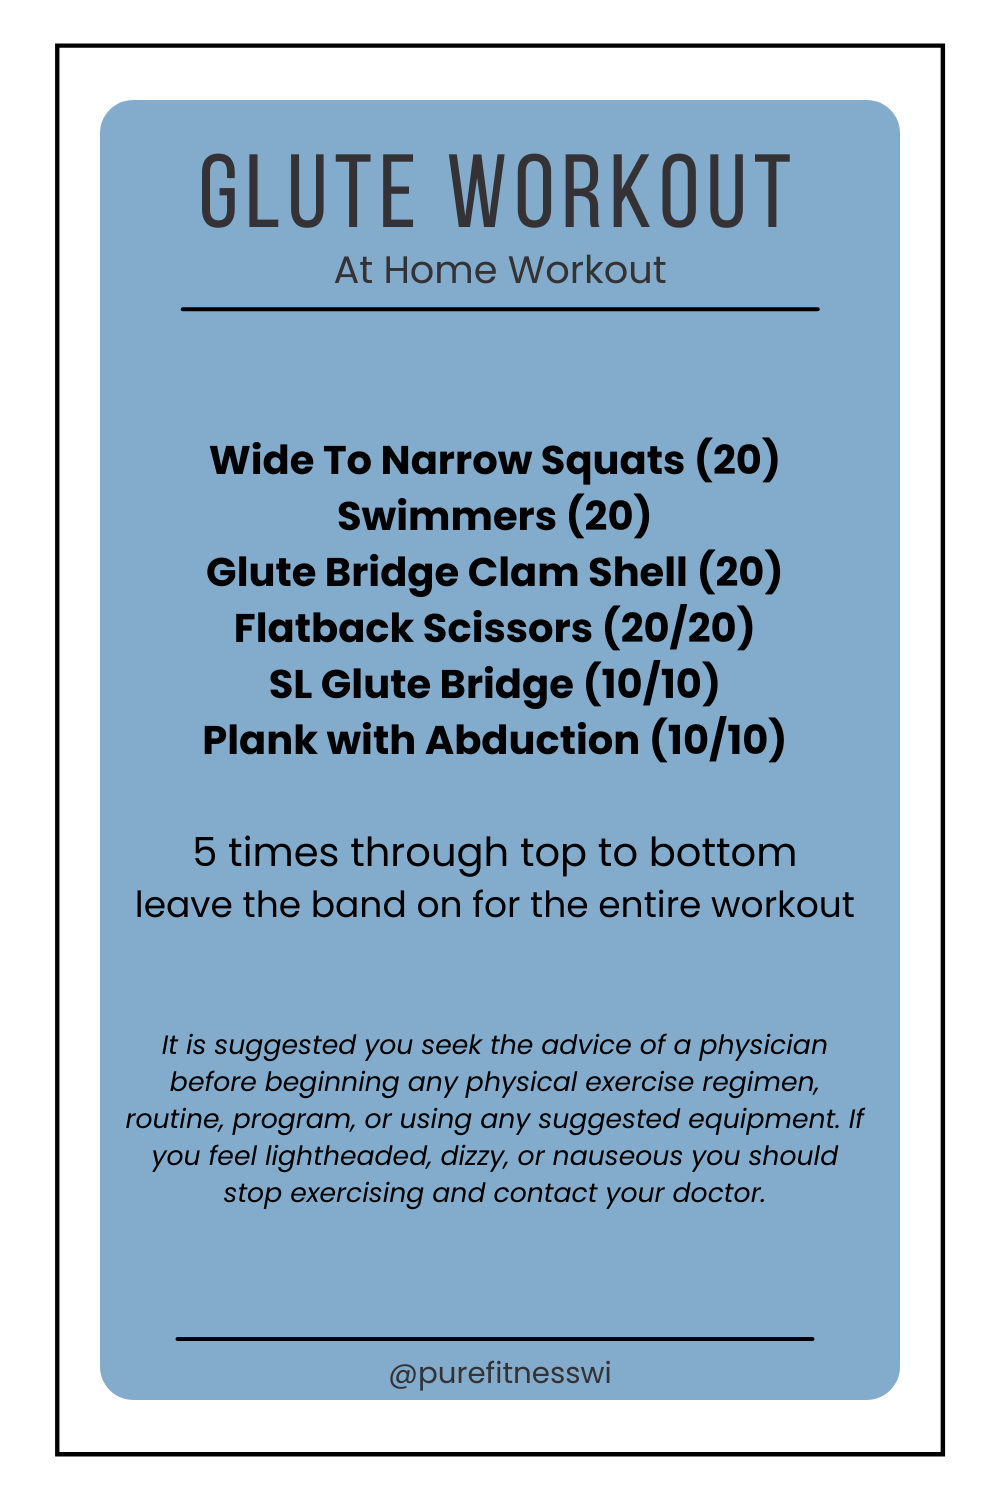
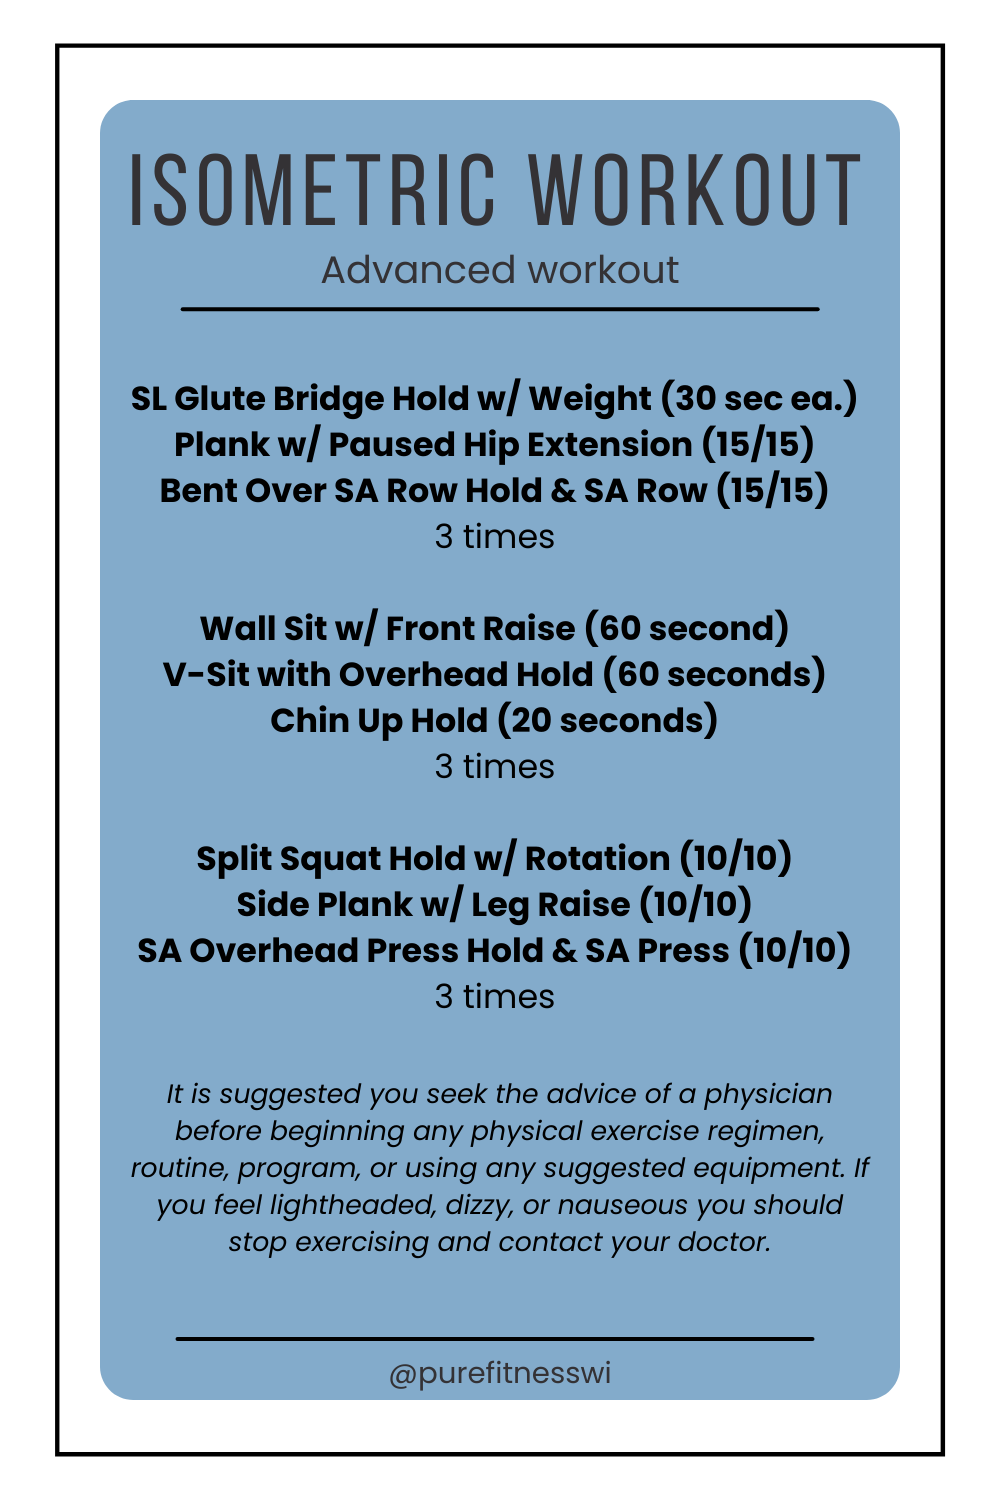
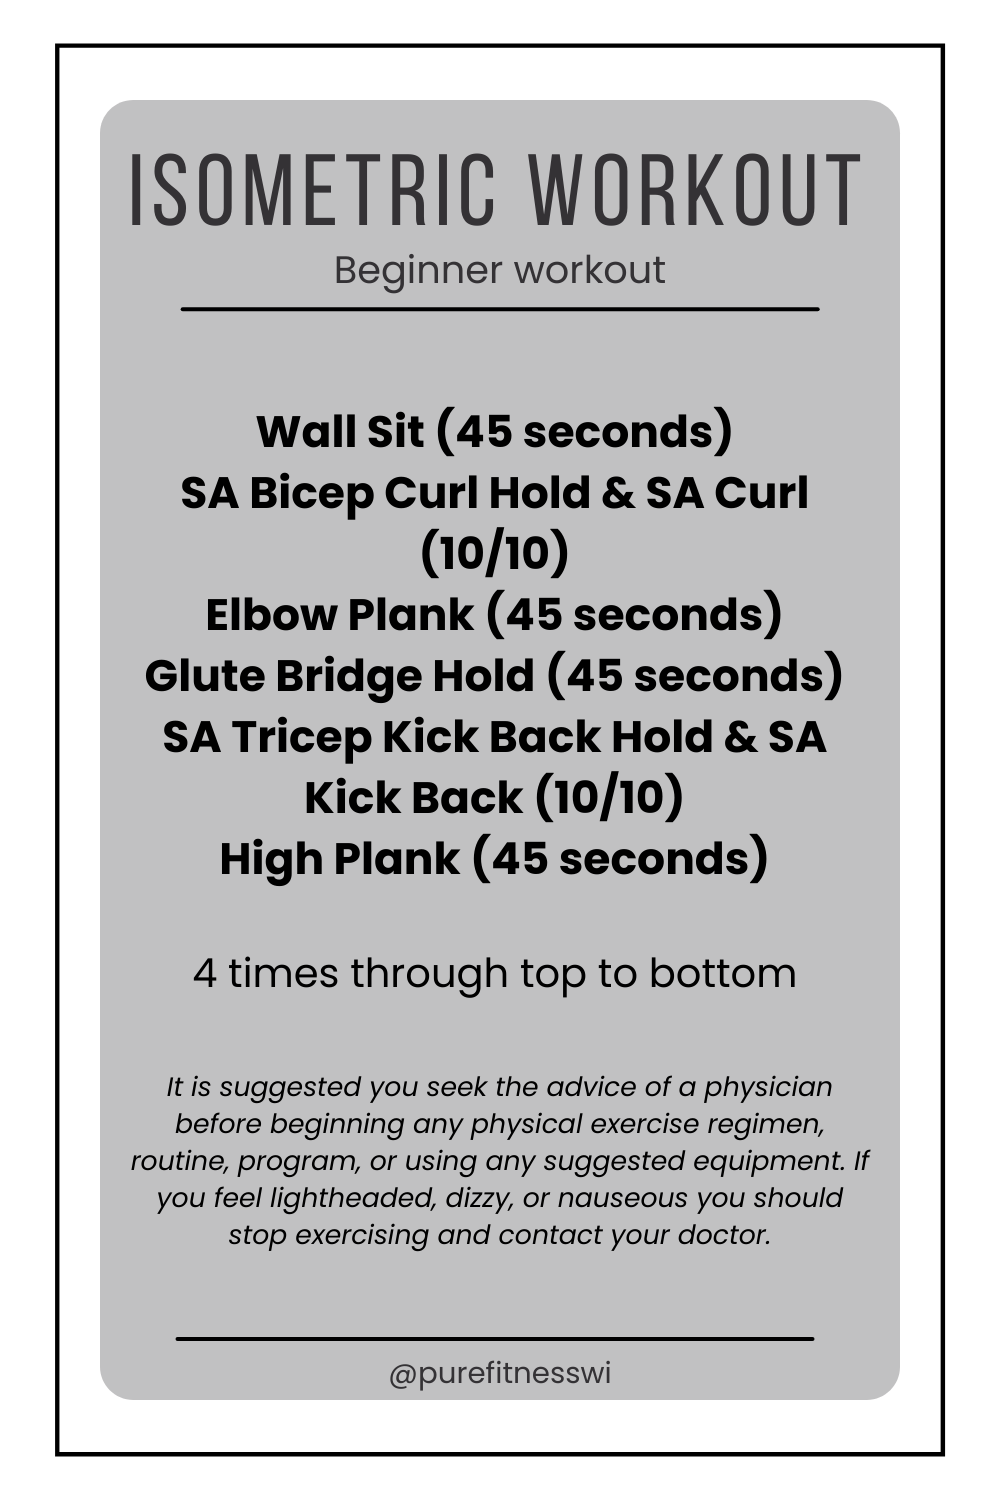
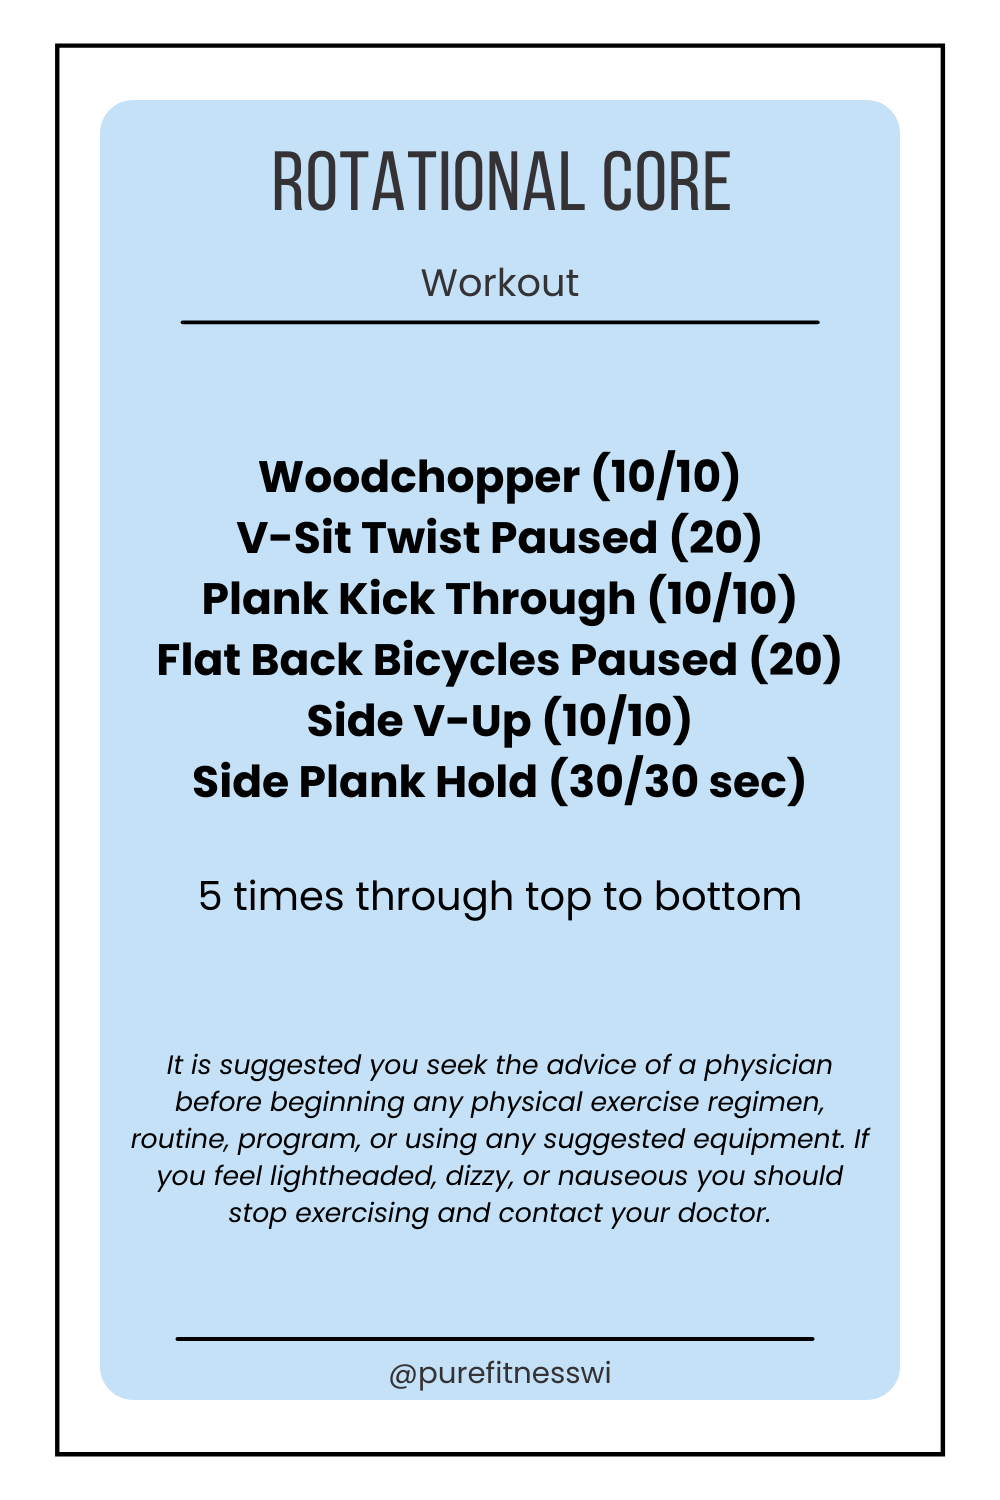
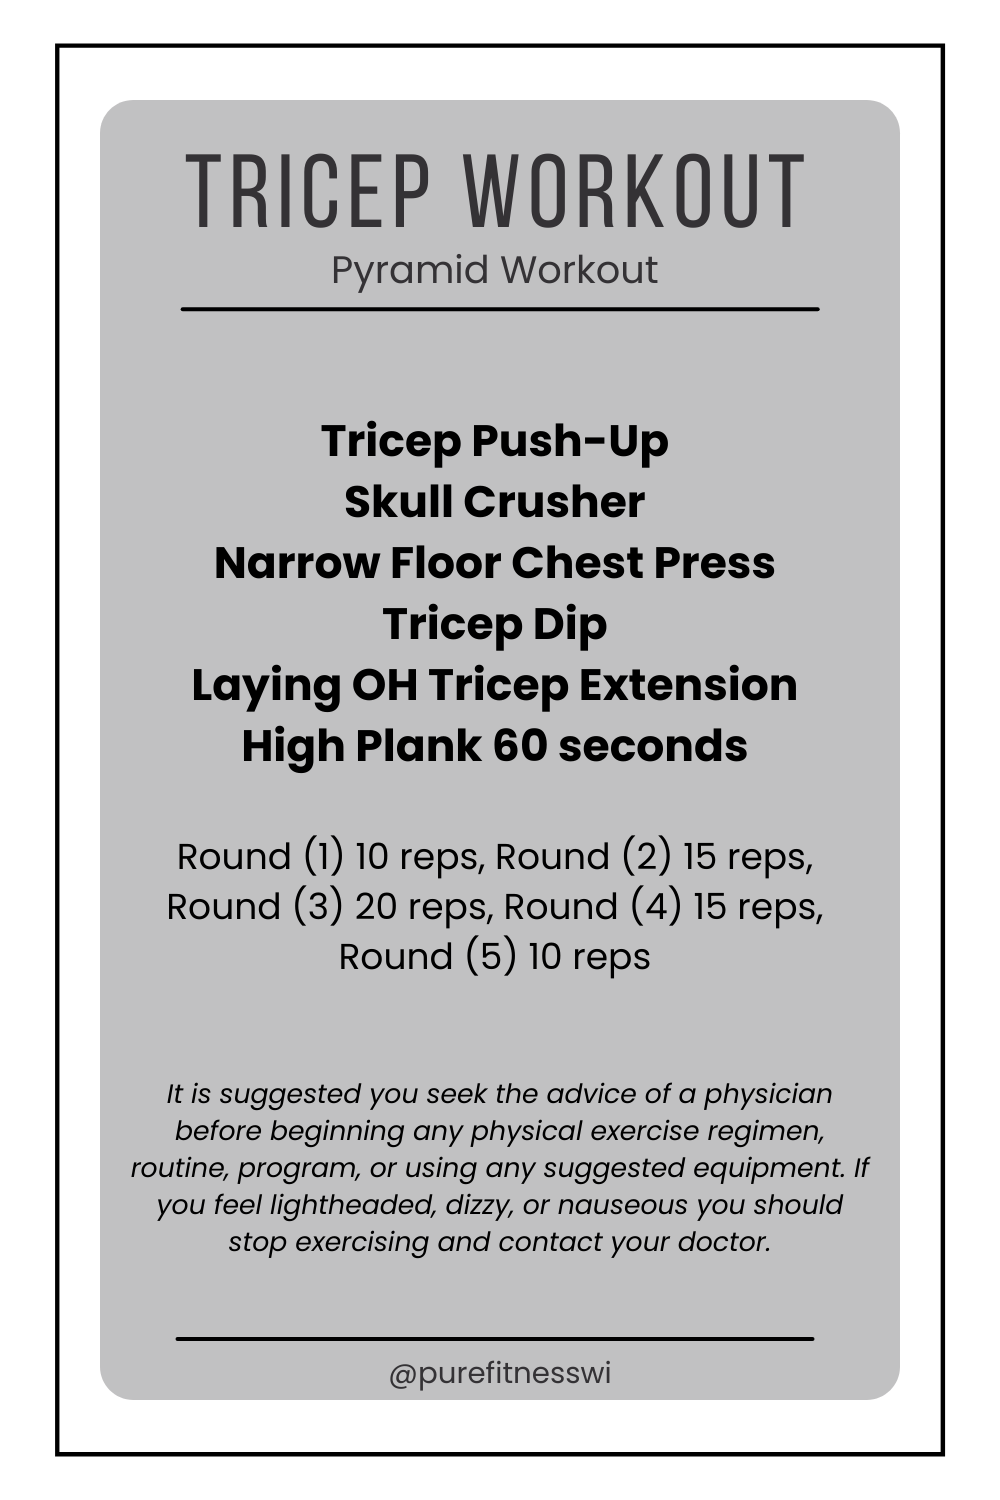
WORKOUTS
There are many workouts for you to download and save. Scroll through them all to find which ones you want to try.


Creating Brand Loyalty as Trainer
read more
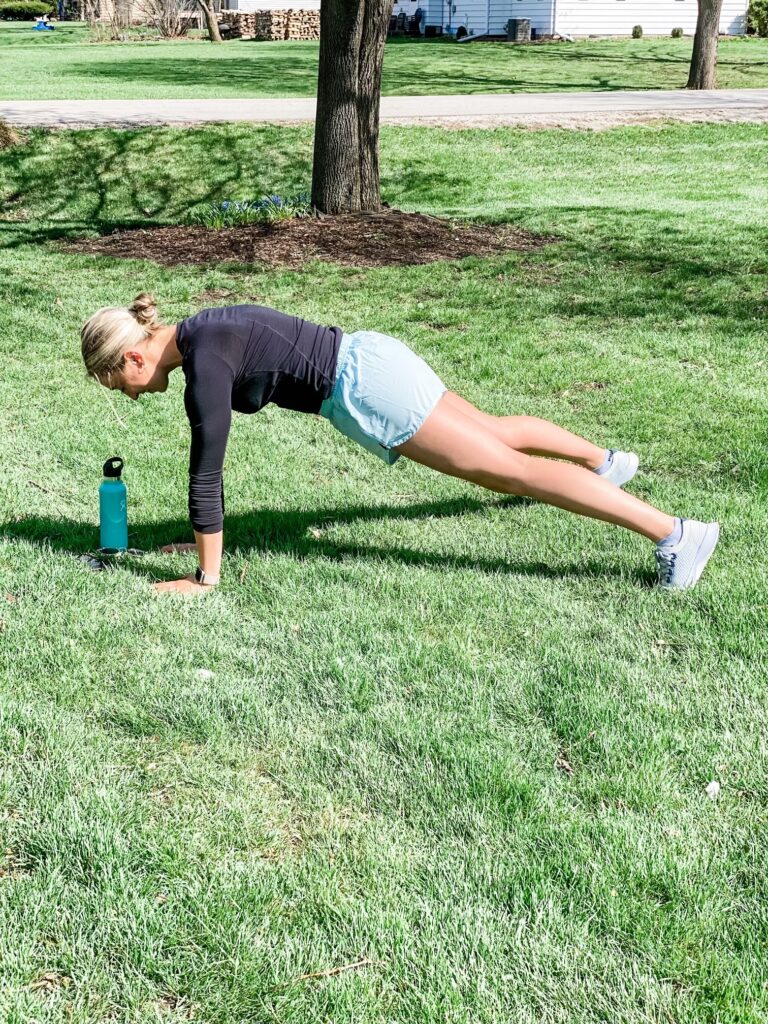
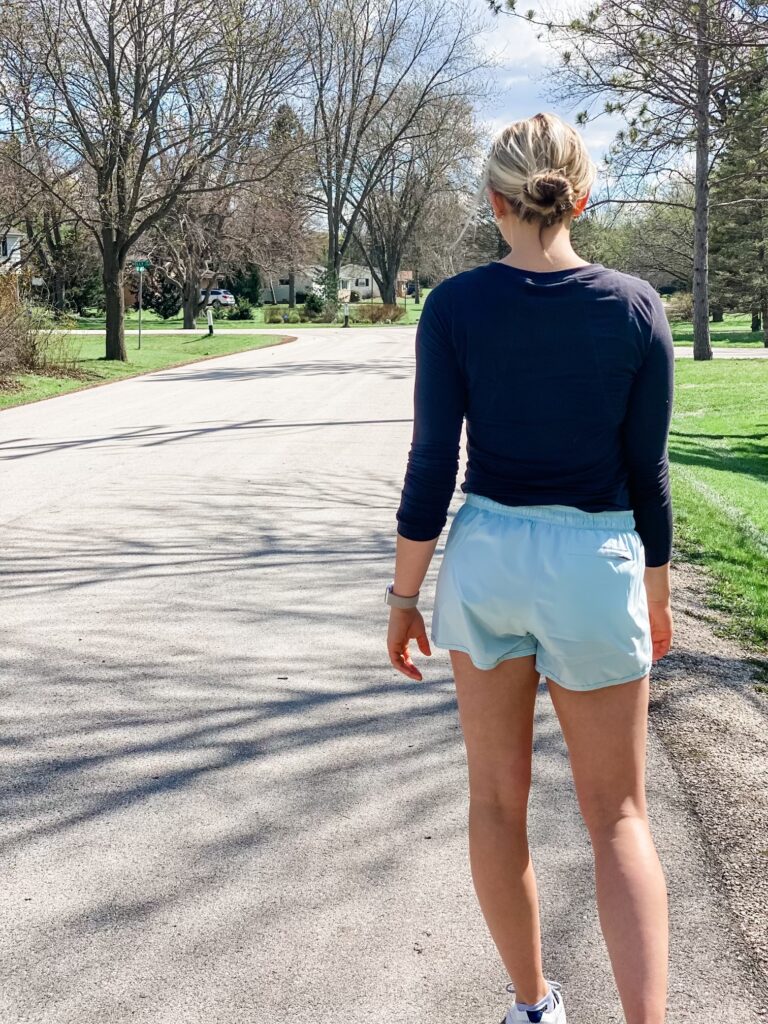
30 Minute Workout Program
I have a great workout program for you. You can scroll down if you aren't interested in why I made this program. But it you are let's have a quick chat. Why is it easier to skip a workout than to actually do the workout? In my opinion it has a lot to do with how you...
3 Ways to Gauge Success As A Trainer
Whether you work at a gym or you’re an owner reflecting and evaluating your performance as a personal trainer is a necessary component to growth and long-term success. Here are 3 ways to gauge your business success as a personal trainer: Client Retention Client...