INCREASE YOUR BACK SQUAT WITH THESE EXERCISES

INCREASE YOUR BACK SQUAT WITH THESE EXERCISES

When starting out, the squat can seem like a very simple movement, right? And it is, but if you are looking to increase you strength in the squat pattern there is a little more you will need to know.

So, let’s start with the basics, almost everyone does a form of a squat everyday. But odds are most of those squats are not performed with pristine form. When it comes to a sport like powerlifting or any time you are trying to move as much weight as possible, things can go wrong if you are not thinking about your form.

The more weight you are doing, the more technical the lift becomes. And any strength imbalances or deficiencies become glaringly apparent. That could mean your form is holding you back from lifting as much as possible. Or even worse, will cause an injury. My goal in writing this article is to help you avoid any pain and squat as much weight as possible.

At some point throughout my powerlifting career I have struggled with every single one of the issues that I will talk about below. Through experience and education, I have learned what I need to do to make my squat as efficient as possible. And I still don’t have it all figured out. But I hope to share with you what I have learned so hopefully you can avoid my mistakes.

After reading this article I hope that you will have a better understanding of how the body moves during a squat and why auxiliary and supporting exercises are so important to increase you squat numbers!
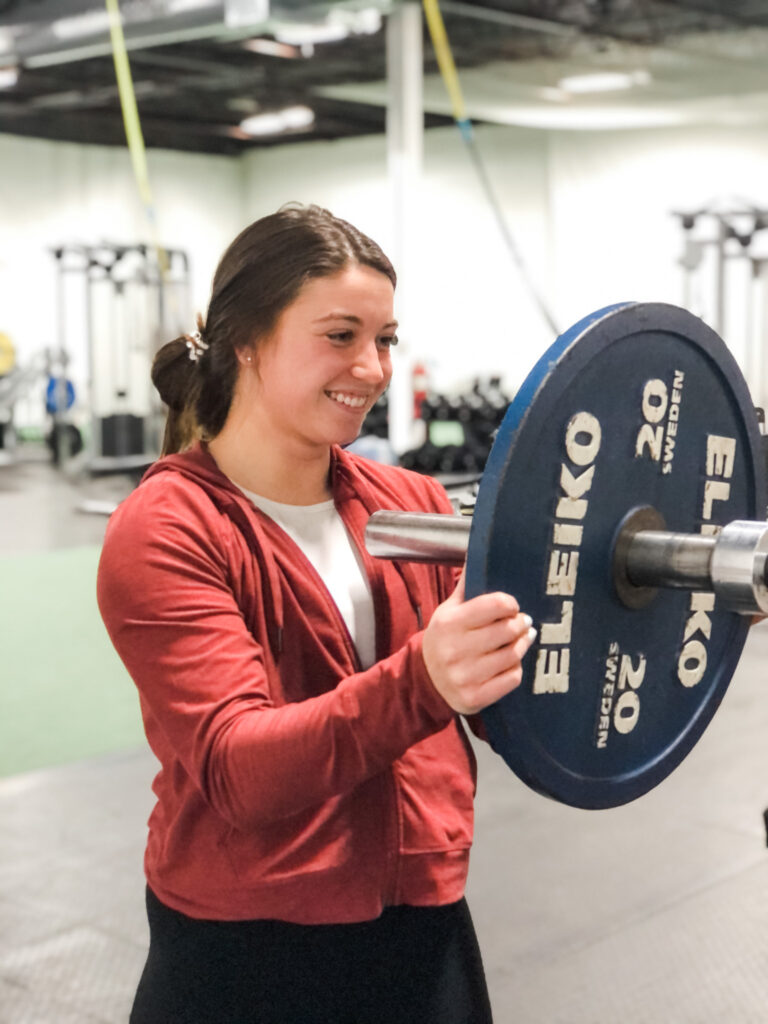
tips for a bigger back squat from a personal trainer

Primary Muscles Involved In The Back Squat

Let’s start by reviewing the primary muscles used in the back squat. This will help you to understand why you want to train each of those muscles individually and how it will help your back squat.

Quadriceps – The quads consists of four muscles on the anterior of the thigh. As knee extensors and hip flexors, the quads are active in both the decent and accent of the squat helping to control the movement.

Hamstrings – The hamstrings are made up of three muscles on the posterior of the thigh. Your hamstrings control hip extension and knee flexion, keeping them involved in both the decent and accent of the squat. 

Glutes – There are three muscles that make up the glutes and they act as extensors at the hip. They are critical to hitting lockout at your hips when finishing the squat.

So in the squat pattern your quads, hamstrings, and glutes are working together to move your body through the correct muscle pattern which allow the muscles to work to their maximum potential allowing you to reach high numbers in the back squat.

If you want to an inside look at my training auxiliaries check out my glute and hamstring exercises.

Main Dysfunctions Seen During The Back Squat 

Sometimes I find that it is easier to start a conversation by addressing common mistakes. Pointing out common dysfunctions in the squat will allow the lifter to be more aware of their body and decrease risk of injury from these common mistakes. So let’s talk about a few of the most common dysfunctions and what can help it.

Unable to hit depth

If you are unable to hit depth this is often due to flexibility in the hip, knee, or ankle and your stability during the movement. Stretching/ mobility training and consistently practicing the correct form will help to solve this issue.

Rounding of the back

Your instinct is probably to assume that rounding of the back is due to the weight of the bar. You are not wrong, but you aren’t entirely right either. The weight on the bar is causing your back to round, but it has to do with your core strength and bracing. If your core is not engaged, or you start the squat with a poor set up, it will be easy to round your back and/or lean forward during the squat. Rounding commonly causes issues with hitting depth and holding you back from squatting the maximum amount of weight. So make sure you have a strong set up and walk out before every lift.

Knees caving in 

This is a very common issue and easily fixable. It is caused by weak adductors. To fix this, exercises like a wall sit with med ball squeezes can help or squatting patterns that have a toe out set-up.

Auxiliary Exercises That Can Help Increase Your Back Squat
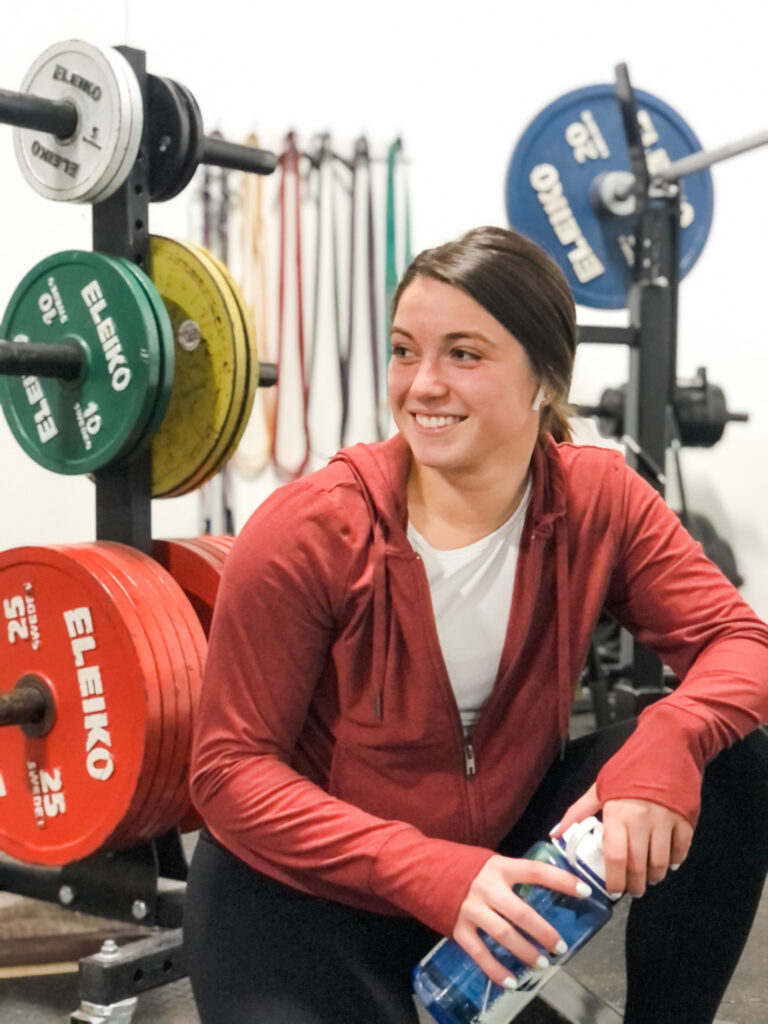
increase your back squat with a personal trainer

If you are looking to increase your back squat you are going to have to start by including auxiliaries into you workout that address your weaknesses. Check out the list I have below. These are some of my favorite and most effective exercises that are categorized by muscle group. Try them out in your next workout and let me know what you think!

Remember that auxiliaries need to stimulate a physiological adaptation. And that requires you work to a maximal level. Similar to you wanting to work to a 1 rep max in the squat. To summarize, if you aren’t pushing yourself on auxiliaries you are missing the whole point.

Exercises to Strengthening your Hamstrings

  • Hamstring Curl
  • Glute Ham Raise
  • Straight Leg Deadlifts

Exercises to Strengthening your Quadriceps

  • Split Squats
  • Front Squats
  • Bulgarian Split Squats
  • Lunges
  • Step-ups

Exercises to strengthening your Glutes

  • Band Walks
  • Glute Bridge
  • Hip Thrusts With Barbell

Exercises to strengthening your Core

  • Deadbugs
  • Planks
  • V-Sits

I can’t really say enough about training your core. It is the number one missing link that I see with clients and I have personally experienced the different of a weak and strong core while back squatting. Maximal effort lifting is an extension of your core strength. Focus your attention on building a strong core and following a consistent training schedule and your lifts will come along. Do the opposite and you will likely experience plateaus and injuries.

Auxiliary Squat Workout

Stretches to include in your workout:

While we focus a lot on what strength exercises will get us to our end goal, you should still consider your recovery exercises in your program. These are my four standard stretches that you should include after a lower body workout day.

  • Standing Hamstring Stretch
  • Standing Side Hamstring Stretch
  • Thoracic Stretch
  • Quad Stretch

Key Points to help increase your back Squat
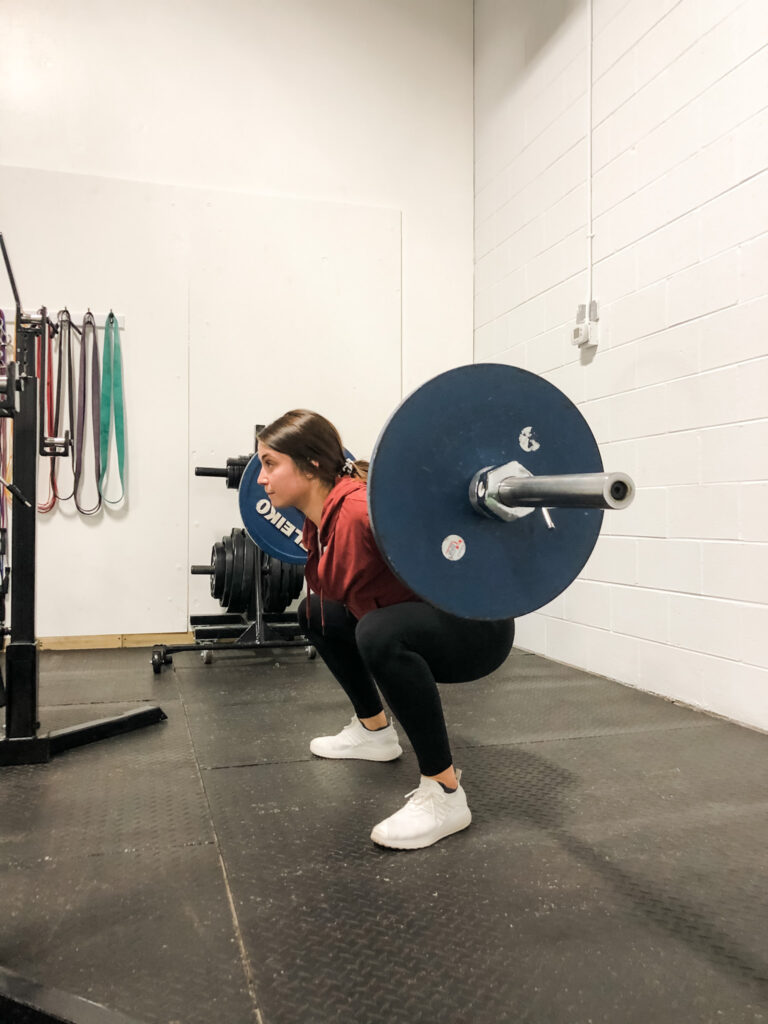
back squat tips

Keeping your core engaged is key! Tension in your core and throughout your entire body will help with proper form and aid in hitting depth. Eventually leading to increased strength in the squat pattern.

Focus on your breathing. This will help keep tension (mentioned above) in your body. If you use a belt, taking a deep breath before the squat will put pressure against the belt keeping you tight and strong.

Sit back onto your heels and push your butt back. This is the very basics for a squat, but sometimes when the weight is on your back people try and compensate, which might help initially, but it will cause a chain reaction that can cause injury and limit your potential strength gains.

Shoulders back and chest up! Again, this is just proper form, but if your setup is funky, it is going to mess up the whole lift. In this case, if you don’t set up strong, you are going to end up rounding your back which will cause you to “taco.” Or if you are able to fight the weight, it will be limiting when trying to max out.

Other Main Lifts

Because of my powerlifting background I associated squat and the other two main lifts of powerlifting. which are bench and deadlift. They each contain their own unique muscular demands, but the philosophy behind training is no different. I have put together an article just like this one on the bench and the deadlift. Follow the links below to get specific information you can start applying to your workouts today.

How to Increase Your Bench

How to Increase Your Deadlift

Or CONTACT ME directly and I’ll get you going with a written program and online coaching
increase your back squat with a personal trainer


WHAT I’M WEARING  SWEATSHIRT | TELETIES HAIR TIES | ATHLETA LEGGINGS | LANE EIGHT SHOES | NALGENE WATER BOTTLE
8 Stretches to Release Tension From Your Desk Job

8 Stretches to Release Tension From Your Desk Job

Stretching is used to help relieve muscle tension. Sitting in the same position for long periods of time, like at a desk, will cause tension to build up in your muscles. That why we have stretches for a desk job, stretches that release the tension you feel from sitting at work.

What to do with a 10- Minute Work Break?

Sitting at a desk all day can be extremely taxing on the body. But wait. You are not actually doing anything, so how could this be harmful? Our bodies actually NEED to keep moving throughout the day. Otherwise, our muscles and joints become stiff and cause pain. We also need to keep blood flowing through our body and our heart working! Previously I discussed just how beneficial taking a break from your desk can be. One of the ways this break can be taken is through stretching.

BENEFITS OF STATIC STRETCHING

All the stretching I have listed below are static stretches. These are stretches that should be held for 30 seconds at the end point of the stretch. They’re beneficial for allowing the muscles to relax into a stretch without entering the stretch reflex stage that cause the muscle to contract and tense up. Stretching, and avoiding the stretch reflex, has been shown to help increase range of motion throughout the muscles and joints in our bodies.

I have listed a couple different exercises that provide a total body stretch. These are designed to release pain in areas that often are tight from sitting at a desk. From your low back, to your shoulders and neck, to even your wrists! Not only are these areas tight from sitting and typing, but can be places where we really hold our stress.

8 STRETCHES FOR TOTAL BODY RELIEF

I realize that not everyone has time for a 10-minute stretch, so I provided 8 stretches that target different muscles. You can choose which ones that you really feel need to be stretched in your own body and fit your time allowance. However, I think you would get the most benefit from doing all of these! It is really important to never stretch to the point of a burn or pain! This will only cause your muscles to tighten more. Stretch until you feel a light tension throughout that muscle!

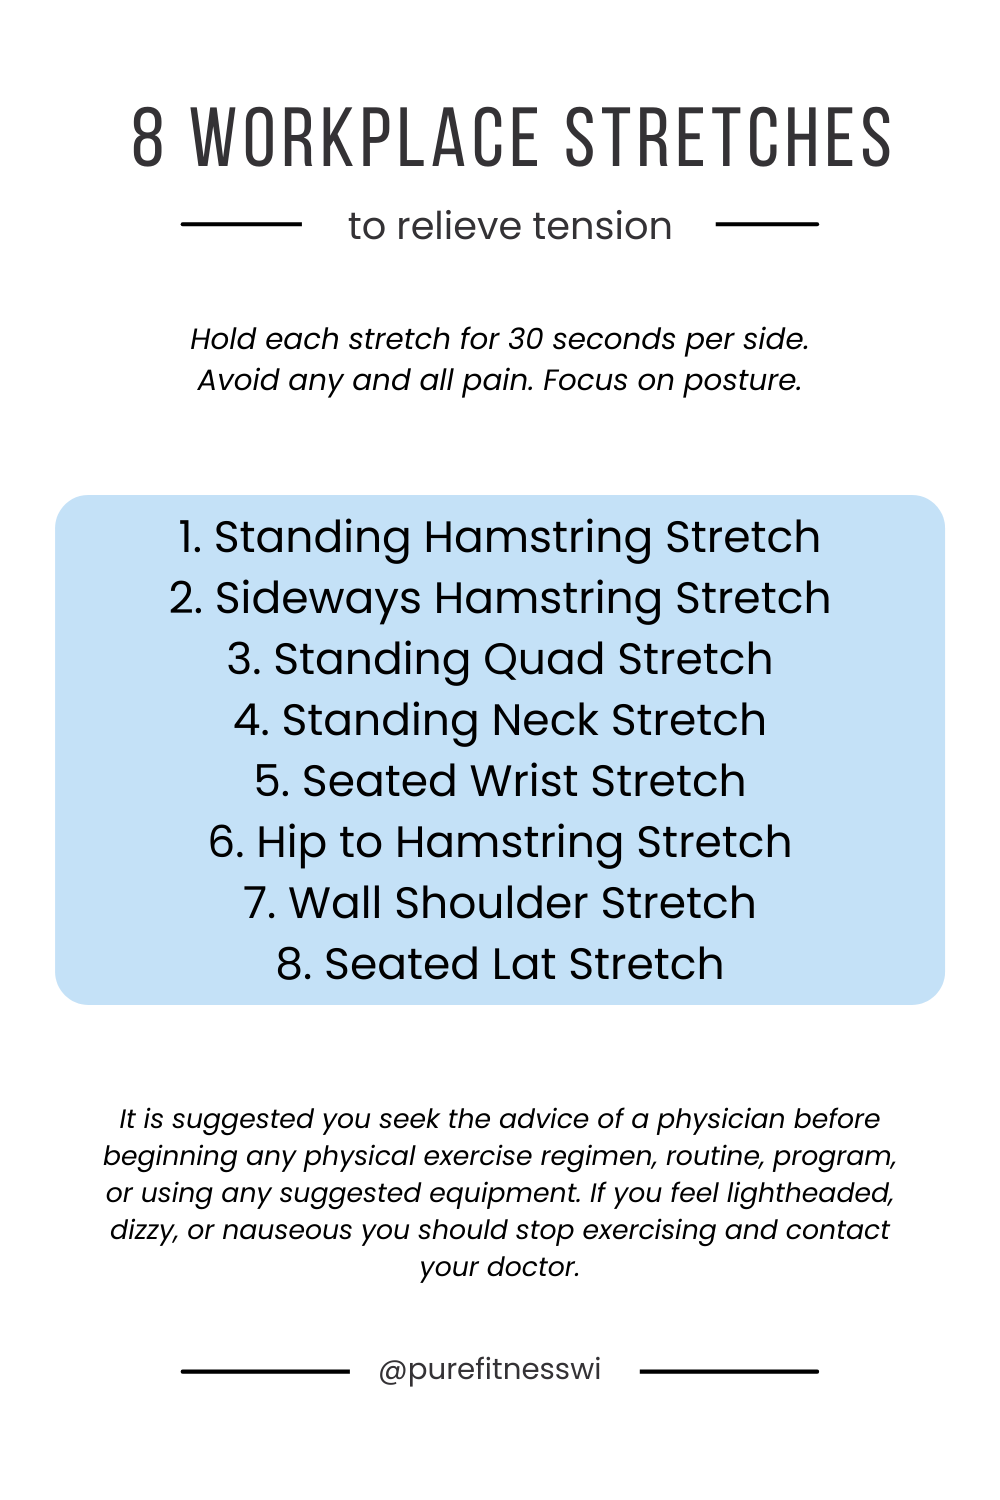
1. Standing Hamstring Stretch

This stretch provides a great release through your hamstring and reduces pain in your low back. Unlike a toe touch, it does not have you bending over, putting strain on your back. It is important to keep your back toe pointing forward & your posture upright. Use a broom stick to help provide extra support and balance! 30 seconds each side // 1 minute total

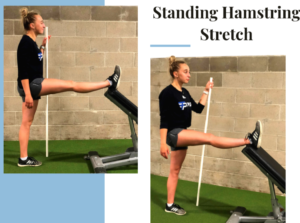
2. Sideways Hamstring Stretch

Similar to the standing hamstring, the sideways hamstring stretch shifts the focus to the inner thigh. This also helps combat low back pain from sitting in a desk chair. Very important to keep the toe of the elevated leg pointing towards the ceiling. 30 seconds each side // 1 minute total

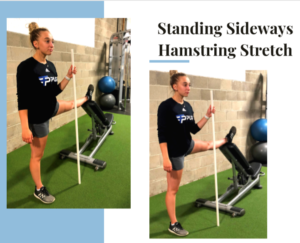
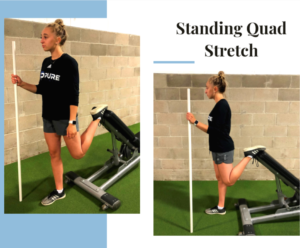
3. Standing Quad Stretch

Focus on maintaining a neutral posture. Specifically, avoid arching at your lower back by keeping your hips tucked under and glutes engaged. The stretch when combined with the two standing hamstring stretches are a great combination in releasing lower back tension. By releasing the tight lower body muscles we can help relieve our lower back. 30 seconds each side // 1 minute total

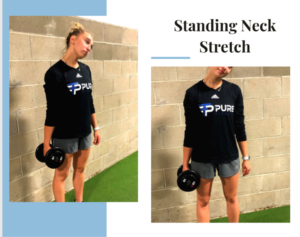
4. Standing Neck Stretch

A lot of people when typing and sitting at a desk get neck and shoulder pain. The standing neck stretch with a resistance can help elongate the muscles of the neck. This will release some of the tension we carry in our neck due to stress as well. Gently bend your neck to move your ear towards your shoulder. Typically a little goes a long way. 30 seconds each side // 1 minute total

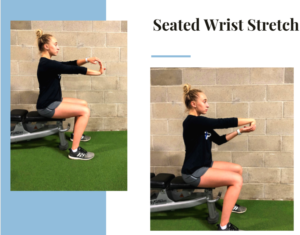
5. Seated Wrist Stretch

This stretch seems really simple, but can open up this joint that is so active in desk work. By pulling our fingers toward our chest, both above and below our wrist we can stretch our wrist and forearms. Doing wrist circles can also help this release. 30 seconds each side, each way // 2 minutes total

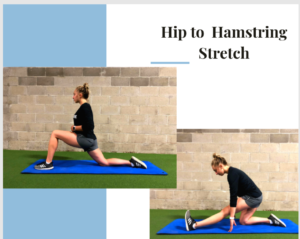
6. Hip to Hamstring Stretch

One of our absolute favorites. This stretch not only provides another great hamstring stretch to relieve tension in the low back, but a good hip flexor opener as well. Sitting at a desk has us keeping our hips in the flexed position. By extending we can release some of that tightness! Remember to keep a neutral spine throughout the movement. Avoid arching in your low back when our front knee is bent. Also avoid excessive rounding in the back when our front leg is straight. 30 seconds each side, each way // 2 minutes total

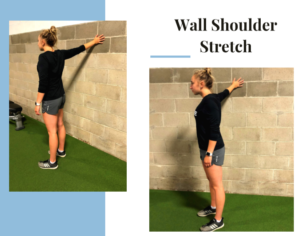
7. Wall Shoulder Stretch

This stretch can release some of the anterior shoulder tension we carry from having our shoulders hunched over at a desk. Using a wall and standing at about a 45 degree angle (or wherever your range of motion is without pain) we can really open up this joint and our chest. 30 seconds each side // 1 minute total

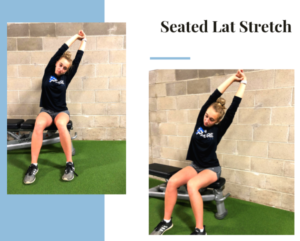
8. Seated Lat Stretch

Commonly overlooked, this stretch allows you to target the latissimus dorsi muscle that stretches down the side of our backs. I love the simplicity of this one because it can be done throughout the day at your desk! Our lats are internal rotators at our shoulders, opening them up will help us open up our chest and fight that rounded “computer posture”.  30 seconds each side // 1 minute total

TAKE A BREAK FOR THESE BENEFITS

Working straight through the day is long, frustrating, and stressful. Taking a couple 5-minute breaks throughout the day can actually help you be better at your job! The American Psychological Association studies have shown that taking breaks is beneficial for mentally focusing on your task at hand. They even suggest watching a dog video, which as you know I love to hear as a dog lover myself.

The same studies done by the APA showed a better attention span, more concentration, and less stressed after taking a break. Still not convinced that you can take those five minutes away from your desk? Maybe one of the suggestions below will entice you enough to take advantage.

HOW TO TAKE A BREAK EFFICIENTLY 

The mental benefits are wonderful for improving your work performance. But what do you do for that break to get the most out of it?

  • Get outside
  • Stretch
  • Take your lunch break
  • Complete a quick & satisfying task

TAKING AN OUTDOOR WALK

This is my personal favorite! A quick lap around the block or even just stepping outside for a minute to take in a deep breath of fresh air can make all the difference. Being that we live in Wisconsin and it can be extremely cold out. I even like to just open the window/door for a second and feel the fresh air in my lungs. It gives me a lot of clarity. I feel like I get to hit refresh before I start my next task!

If you live in a warmer climate, even sitting outside for a conference call can be refreshing. Or even better, taking a few moments of quiet before a presentation with the warm sun and fresh air can be a unique combination of energizing and calming.

RELEASE SOME TENSION

Do a couple of stretches to release the tightness you feel from sitting at a desk. Standing hamstring and quad stretches can help relieve tension in the lower back that can be caused from sitting at a desk. Shoulder stretches and even stretching your wrists can help those of you stuck typing and hunched over all day.

LUNCH SHOULD BE YOUR BREAK

Don’t just eat lunch, actually take your lunch break! Bringing your lunch back to your desk and continuing to work gives no relief to the stress of the job. Allow yourself to make a balanced, healthy lunch. Refuel and recharge to tackle the afternoon. Mid afternoon exhaustion will only hit you harder if you work throughout the lunch hour.

DO SOMETHING ENJOYABLE

Take time for a task you enjoy! Simple things you can do are petting your dog, watering your plants, read a quick chapter of a book, draw a picture, or even call a friend. Find something you enjoy that can be done quick, especially after you have a stressful phone call or accomplish a difficult task. 

Consider even taking a few minutes of stillness. It doesn’t have to be anymore than sitting still and not looking at the phone, computer, TV, to do list, etc. Give your brain a moments rest from the action. I promise you it will feel incredible and you will want to do it everyday … more than once.

WHY TRAINING YOUR CORE IS ESSENTIAL AND EXERCISES TO GET YOU STARTED

WHY TRAINING YOUR CORE IS ESSENTIAL AND EXERCISES TO GET YOU STARTED

Training your core is so much more than sit-ups and crunches. The approach you take to training your core is like laying the foundation for a house to built upon. Do it poorly and the house won’t last. BUT if you prioritize the foundation and put time, energy and effort into it the house will last. Keep reading and learn more about why your core is the foundation and how you should be training.

CHASING THE SIX PACK 

Many people are on the search for their “perfect summer body”. This often starts with the illusive six-pack that many are chasing. An accessory for their favorite summer outfit. But is the 5-minute ab workout the right fit?

I think it is important to state that I have been in that exact scenario in years past. Googling workouts to find a quick fix on how to get there in 2 weeks. Contrary to popular belief, this cannot be attained. Even the 50 crunches a day and the 5- minute ab workout won’t do it in 2 weeks. I want to offer you a new perspective on core. I want to show you what building a strong core means and does for you.

THE TRUTH ABOUT CORE

Yes, doing ab exercises can build strength in your abdominal muscles just as doing bicep curls strengthens your biceps. However, looking at this as the key to your swimsuit body is only a snapshot of the picture. The hard truth is that our core is essential to our general existence. We wouldn’t be able to stand up and walk around without core muscles.

Your core is more than just your abdominal muscles. It includes not only your “six pack” (rectus abdominus), but all of the muscles that are in the trunk of your body like your back, hips, and glutes just to name a few. Training the core as a whole can bring many benefits such as:

  • Reduced back pain due to proper activation of abdominal muscles
  • Increase in stability and balance through strong core
  • Teaching the body to engage the core in everyday activities (yard work, lifting groceries, etc.) 

If your swimsuit body needs a six pack to go along with it, you will need to hit the kitchen. The gym is not likely the only “missing link”. But remember you do have one, because our core is our foundation. The stronger it is the healthier you are. Regardless of whether you can see it or not.

WHERE TO START

Here are some of the favorite and effective core exercises we love at Pure Fitness. Bonus is that you can do them at home. Side note, there are a significant number of variations for each of the exercises below. These are a good starting point to train your core in a variety of planes of movement an under different loads.

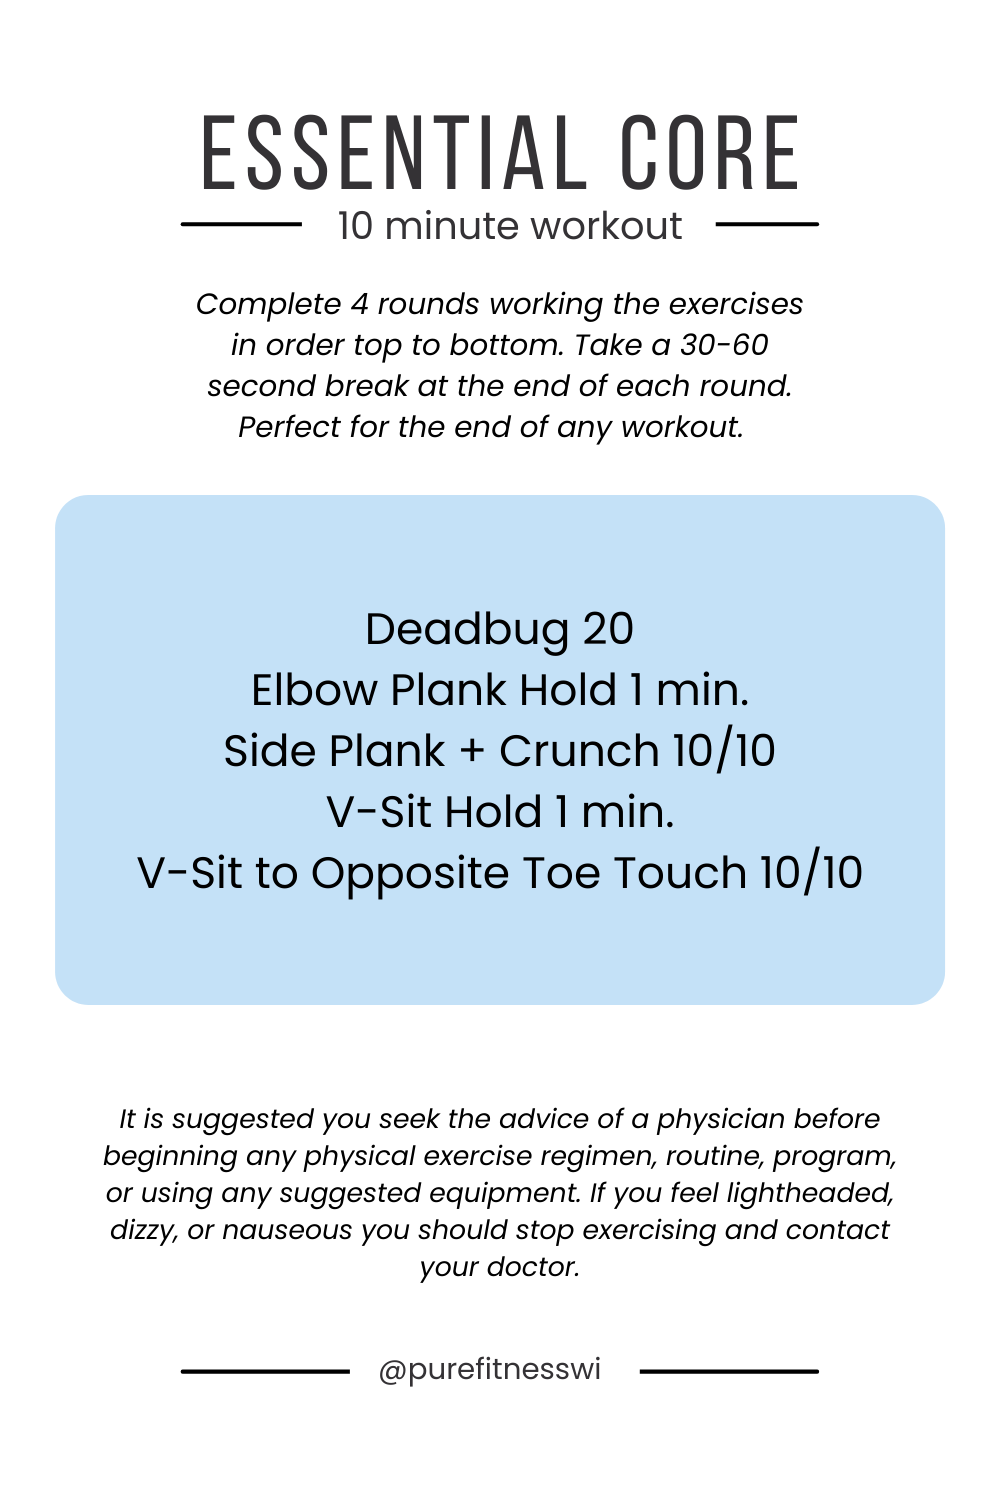
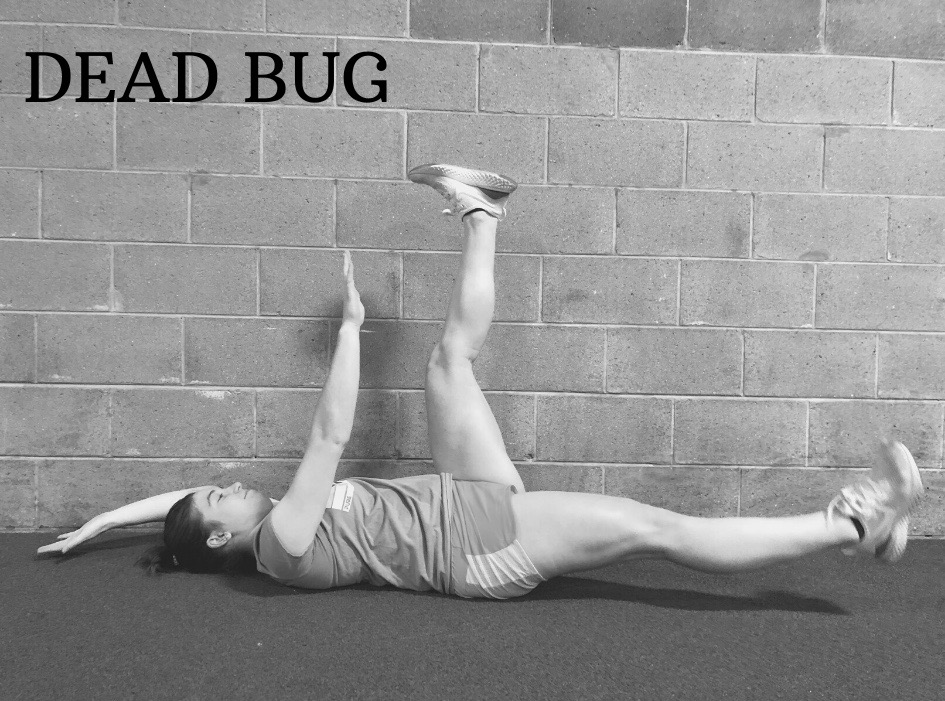
Dead Bugs For Training Your Core

This is definitely my go-to exercise for helping people learn to engage their core. This position allows us to teach people how to engage their core and stabilize their low back/pelvis, preventing extension and flexion of the spine, while limbs are moving. 

Focus on keeping your back motionless and driven into the ground as you move arms and legs. Any arching of the back away from the ground should be considered as a failed rep. Try to reset your core, brace into the ground and begin moving again. Remember that you are in control of the range of motion. You can always shorten or modify range of motion to ensure quality of reps. Then over time you can increase the range of motion as you become stronger.

For an easier modification bend your knees and for a harder modification hold a light weight in each of your hands.

We consider this a gold standard of core exercise!

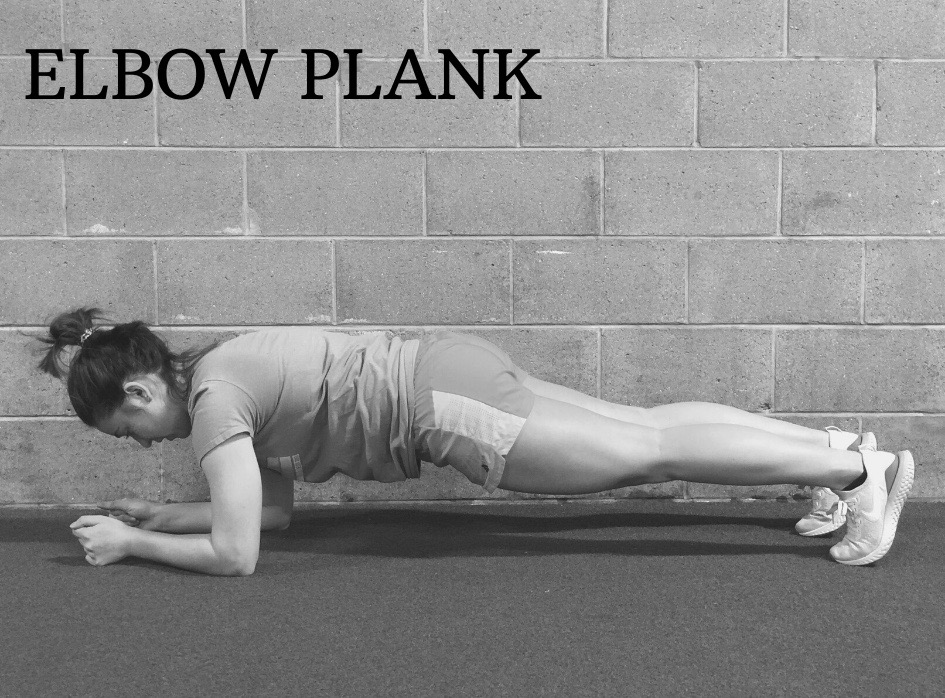
Elbow Plank For Training Your Core

A simple, but effective isometric exercise that not only engages your abdominal muscles, but your shoulders as well. I personally love planks to work on stability. It is easy to feel/see when you are working through your back as your hips sink and abdominals extend.

Focus on keeping your hips tucked up so that your low back does not arch. With tucked hips, you will notice that your low abdominals really turn on and help stabilize your body.

I encourage you to think of your core as including your glutes and shoulders on this exercise. Pay attention to both and everything in the middle to get the most out of your elbow plank.

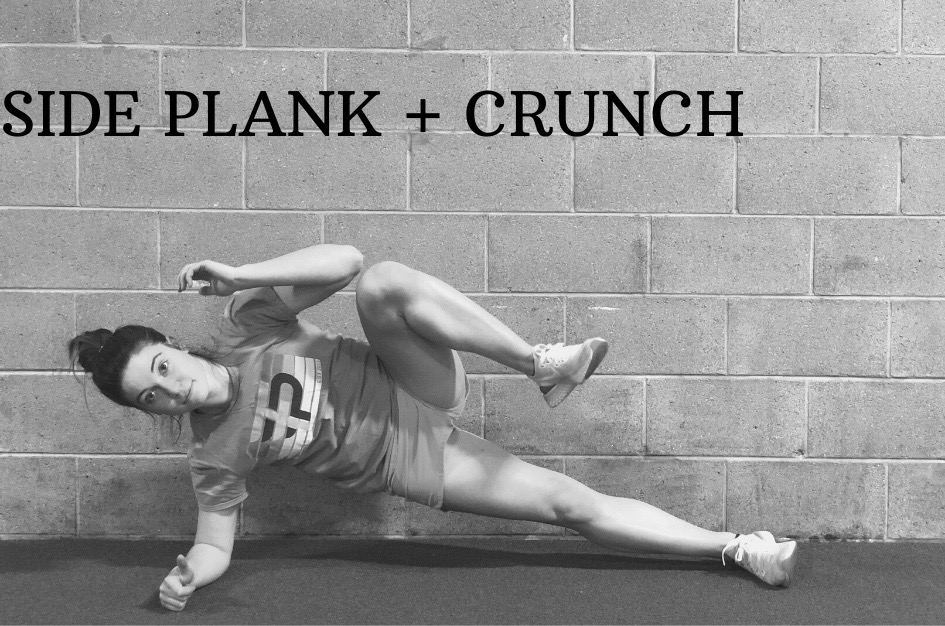
Side Plank + Crunch For Training Your Core

I always love using this combination exercise that can work in two actions, isometric and concentric. A great exercise for working your obliques and uses your bottom glute to support as well! Remember our core is hips to shoulders, training them synergistically is important!

If you struggle with holding a side plank we suggest you focus on properly holding a side plank before adding the crunch. You can also modify this exercise so the bottom knee is bent and resting on the ground. This will make the side plank portion easier and hopefully allow you to incorporate the crunch successful. BUT don’t give up on side planks. You’ll still need to practice them to build up your strength.

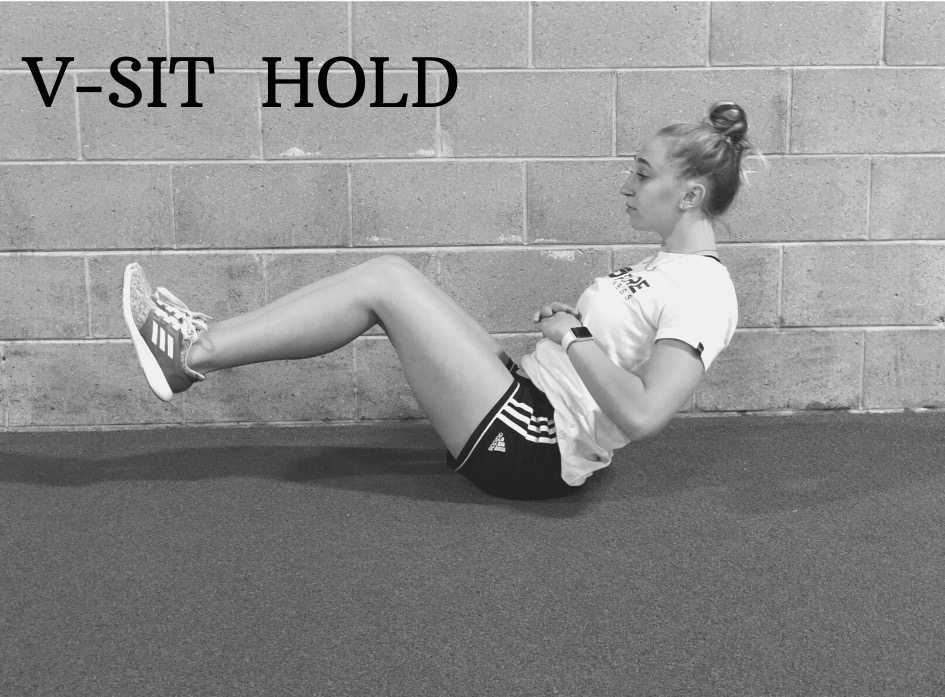
V-Sit Hold For Training Your Core

A different way to work isometrically by really isolating your abdominal muscles. This exercise will show you if you are working through your core or your back. Many people do v-sits with constant back pain. If you are one of those people. Stop.

The best way to avoid back pain is to focus on a crunch in the abdominals. Most of the time we think of a v-sit as having a flat back and very up right posture.

For a modification you can try placing your hands on the ground next to or just behind your hips. This will allow you to de-load the exercise by supporting some of your bodyweight.

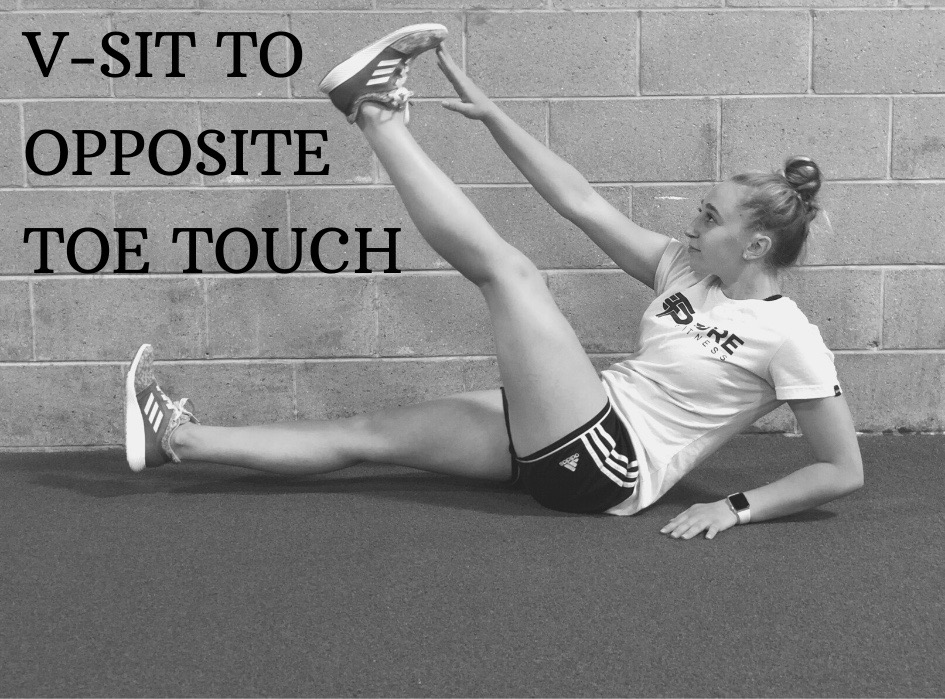
V-Sit To Opposite Toe Touch For Training Your Core

This active variation of a crunch can really create a great burn for your abdominal muscles. For beginners, keeping your back flat to the ground can help stimulate the correct use of core engagement. We find the key is to tighten your core before lifting your arm or leg.

Modifications for this exercise can be to leave your back flat on the floor through the entire movement. Focusing on bracing into the ground before you move either your arm or your leg.

Additionally, you can bend your knee moving in a tuck and extend movement pattern as opposed to the straight leg swing.

MY THOUGHTS ON CORE

Just like in life there are no easy short cuts. If it sounds too good to be true (5-minute six pack) it probably is! Spot reduction is not something that has been proven by science to work. And I have yet to see it work in the gym.

Keep in mind that every single person is different. We all have unique metabolisms and body types. Just as I stated in my post about nutrition, it is about creating healthy habits that you can sustain for life. I suggest focusing on building a strong core for a better life, not chasing a six pack that somebody else has. I believe in building a strong body, not an Instagram-able body! 

3 Beginner Nutrition Tips from a Registered Dietician

3 Beginner Nutrition Tips from a Registered Dietician

Hopefully you landed on this blog because you are looking for some nutritional guidance. Because I, with the help of a registered Dietitian, are going to give you three beginner nutrition tips. They are a great place to start if you are just getting going on your food journey or if you are overwhelmed with the information you have already found.

This post contains affiliate links. I make a commission when you order through one of my links, but there is no increase to the cost you pay.

Changing Your Nutritional Habits

As creatures of habit and routine, the thought of changing up our lifestyle can seem overwhelming and sometimes scary. Especially when it comes to nutrition. We all have our reasons for wanting to change our diet for the better. This often comes with a drastic change in completely eliminating foods we enjoy or extreme cuts in calories. I sat down and interviewed Elizabeth Kasparek, a Board Certified Specialist in Sports Dietetics with Sanford Power at the Sanford Sports Science Institute in Sioux Falls, SD to talk about beginning. Although Elizabeth is a Sports Dietitian, she works with every person from middle school to college athletes, or from general population to marathon runners. She has seen a multitude of different people coming through her door asking for the same advice you are seeking here.

Where do I Start?

When it comes to basic nutritional guidelines Elizabeth likes to share with those who ask her where to start. She gave three basic actions to take:

1. Drink more water!

This is just one example of a small change, but a common one everyone can follow. She emphasized that pretty much everyone could use more water in their day not only to help your body feel better, but to help you think sharper. If you are someone who struggles with drinking more, she suggests always having a water bottle in your hand. You can flavor it with a zero-calorie sweetener if need be.

This is one area I am STILL working at. Some days I knock it out of the park, other days … well let’s just say it isn’t good. I have found it helpful to use the same water bottle so I get use a schedule of evenly consuming water. I love hydroflask – this one is my favorite. Water is also important for your recovery between workouts, your level of focus and energy throughout the day and your sleep.

2. Find ways to add a fruit or vegetable at every meal (emphasis on the vegetables)!

Elizabeth said that this is a great place to start when thinking about changing your nutritional habits. She encouraged creativity and customization in this department! Try adding spinach in your smoothie (that’s an easy one!). Or putting steamed broccoli in your mac and cheese (yes, her suggestion!). Or maybe trying something more neutral like mashed cauliflower in your mashed potatoes. 

I personally encourage myself to try a new recipe often. Not just something that I haven’t made before, but something I normally wouldn’t eat. Sheet pan cooking is so convenient and fast I knew I wanted to try it. So I went for a chicken, broccoli, brussel sprout and gnocchi dish. It. Was. Amazing. Big bonus is that it worked in two vegetables into my meal.

3. Build a balanced plate!

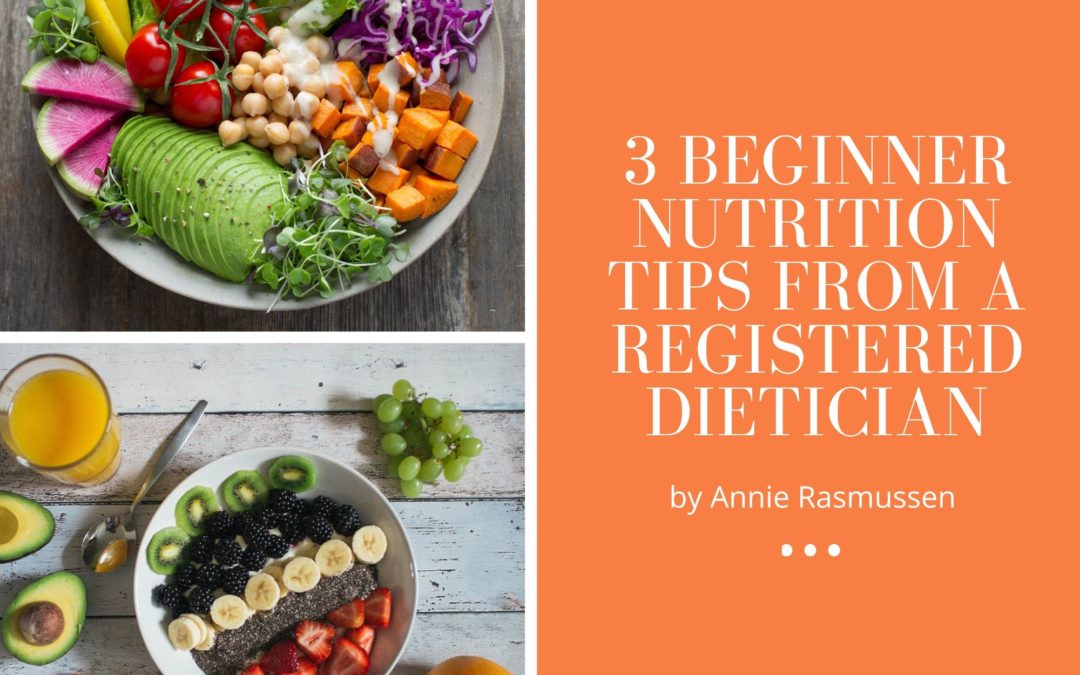
When it comes to the basics of a balance plate, Elizabeth talks about half your plate being fruits and vegetables, one fourth carbohydrates (complex preferably), and one fourth protein. This also includes about a teaspoon of fat that could be found in a healthy oil, for example. One meal that she emphasized people forget to do this with is breakfast, in which a lot of high carb meals are found, and protein gets lost. She suggests adding an egg or greek yogurt to the morning mix! Check out the plate example she provided below. 

balance plate for easy training or weight management

I found this example helpful. As a visual person, it struck home. As a former collegiate athlete adjusting my food consumption to my new lifestyle has been a challenge. The fact this these portion sizes are for easy training days and weight management gave me the perspective I needed. If you want to learn more about transitioning to life after college athletics read this.

In this article I share what I learned from reading The Healthy Former Athlete by Registered Dietician Lauren Link. The five main points that you and I can apply to our lives immediately to help the transition move more smoothly. It is also a very relatable book for post collegiate athletes. Giving us the feeling that we are not alone.

Get your copy of the book here!

What are the Take-Aways?

Elizabeth stated that it is what you do consistently that matters. She found through studies she has read that many diets require drastic changes of which the majority end up gaining the weight back eventually. It is about finding healthy habits that you can sustain for a healthy life. She suggests simply tracking what you eat for a couple days and how that food makes you feel!

After talking with Elizabeth, I took away that just like exercise, nutrition is not a one-size-fits all plan. Find sustainable habits that help you feel like you are fueling your body for success. So maybe today you start with drinking one extra cup of water. Tomorrow you focus on adding a vegetable to your dinner plans. Changing your nutritional habits can be overwhelming but focusing on one step at a time can make the challenge a bit less daunting.

Write down your one focus for nutritional habits and remind yourself of it daily. This will help prevent you from being side tracked by trying to do too much at once.

ASSESS YOUR ENDGAME & AVOID FAD DIETS

Have you heard of fad diets? Do you know how to identify a fad diet before it’s too late?

It is no secret we are in the age of information. Any question we have on any topic can be searched and within seconds we have thousands of articles with answers. However, we are faced with a challenge. Which information is credible and which is coming from unqualified sources?

This is where fad diets come in. I started typing in Google “what diet” and the top answers were “works best for me”, “is best for losing weight”, and “pill was on Shark Tank”. The world is looking for quick fixes and from sources that know nothing about them or their body type. It is easy to find information that supports your ideas about weight loss. But we must determine what is fact and what is fiction.

To ensure that my information is reliable I looked to registered dietitian, Elizabeth Kasparek, for some insight. She has seen first hand what happens when strict diet and restrictions are held on unhealthy foods. It has been shown that although it works for the time being, eventually people return to their bad habits and gain the weight back.

Yes, some diets work. They get you to lose the weight in the time you want to lose it. But Elizabeth begs you to answer the question, “Why is that number your ‘ideal’ weight?”.

For some this is a weight they had in high school or when they were under a lot of stress and fueling their body was not a priority. Their bodies may be weak, but they hit that magic number on the scale! This is not the case for everyone, but it is something to consider when evaluating your weight loss goals. Are you reaching for a number on a scale? Or a better lifestyle that has you feeling healthy and strong?

Making sure that your endgame or the reason why you are adjusting your lifestyle has your best interest at the forefront is vital. Without a strong “why” the likelihood of succeeding short term or long term is low.

EVALUATING YOUR PERSPECTIVE

Again, the key is to think about the quick fix. Or should I say STOP thinking about the quick fix.

Elizabeth put it as “what is the diet or diet pill worth to you”? Do you have to make drastic changes and cut out a macro nutrient? When looking at our diet we have to consider whether these sacrifices are sustainable.

This article is not a how-to on weight loss or a road map to getting your beach bod. It is perspective.

I want to offer a perspective on the diet culture with the help of a registered dietician. And I want you to step back and look at your perspective. Double check yourself because no one else is going to do it for you.

Elizabeth talked about when you see dieters or plans on social media. She stated that it is good to consider that they may be getting rid of their other unhealthy habits along with the diet plan they post. Meaning, it takes more than a sheet of paper to get you from A to B. This is an important piece to consider before going all-in on a product you see.

Another way to think of this is, what else will I need to be successful? Often the diet plan is not the only factor.

Elizabeth encourages us to focus on weight loss in a healthy way. It is all about the habits you are forming! Another interesting perspective she posed was the idea of thinking of your family or friends. Would you want them following this crazy diet? And if it is not beneficial for your whole family (i.e. kids, spouse, etc.) is it the best idea for you?

ESTABLISHING YOUR PERSPECTIVE

Finding a realistic well-round approach is going to be best. And thats something fad diets wont tell you. You may want to consider how your sleep is impacting your life, health and even workouts. It is probably much more than you recognize. And don’t even get me started on stress and it’s impact on your life. Stress eating is a term for a reason. Finding ways to manage stress will be essential to success.

Recovery will be another important part of your road to success. You eat well, you sleep well, you are managing your stress levels and you are getting some killer workouts in. Now you may start to feel worn down, or beat up or stiff. That’s likely because you aren’t finding time to recover. And let’s be clear you can feel this way from a long, stressful day at work. So having a go to recovery program can be beneficial.

FIND YOUR PATH AWAY FROM FAD DIETS

This is not to say all diets are frauds. One example that Elizabeth supported was the use of the Mediterranean Diet. She has stated that this has great research behind it! Because it actually is based off of eating habits and been shown beneficial for heart health. But I am saying to beware of big promises and quick fixes. Diet is a long term lifestyle.

As Elizabeth encouraged me to pass along, it is about finding trust-worthy sources. Speak to a local registered dietician. Educate with articles from sources that don’t end in .com. Research thoroughly before trying the latest trend.

I would like to reiterate that I am not here to tell you what diets to follow or what is the best. I am simply giving a different vantage point and encouraging you all to make an informed decision when choosing what fuels your body! Just as I said, we are in the information age. Use it wisely.

Pain Free Golf

The Importance of Core Strength & Flexibility

We have all been on the course and seen people with the elbow straps for tendonitis. Or halfway through the round someone in your group is in agonizing back pain that they say is always there when they play. You can watch people on the tee box, and they have a half or quarter swing because anything more hurts their body. Which, as a result effects their game and scorecard. Maybe this is even be you on the course. Let’s learn why and how you can fix it. 

Golf is a sport that ranges from youth to the elderly. It can be a great way to get some exercise in, enjoy being outside with friends and be competitive. Whether you’re a youth player learning, a highly competitive pro trying to make it, or an amateur who just loves the game, the answer is the same. Core strength and flexibility is what allows you to be pain free and perform better. Doing the right, simple and easy things will allow you to be pain free and improve your game at the same time. 

These are affiliate links. While there is no cost to you when you order through them, I do make a commission. Your support, by ordering through them, is greatly appreciated!

Impact of flexibility on swing ROM and chronic pain associated to it

One of the most common complaints in golf is low back discomfort and/or pain. Your golf swing is your unique Range of Motion (ROM). Flexibility has a massive impact on swing ROM. Which means flexibility can also be the main component to relieving chronic low back pain in the golf swing.

The human body is amazing. Even though flexibility may be lacking, the body will do its best to find a way to still complete a task. Speaking specifically about the golf swing. If you lack hamstring flexibility you will not be able to complete a full turn in the golf swing. Which in return your low back will have to do much more. This is because instead of rotating you will start to extend during your back swing. Your low back will take the complete & constant load of the movement.

The low back and muscles in that area are not designed to take that constant load and as a result of poor hamstring flexibility you now have low back pain. Unfortunately, you also have a weaker swing because it is not efficient. This is the most common example of chronic pain in golfers we see, but there are several others. This example really shows why flexibility plays such a massive role in pain free golf. 

By prioritizing a flexibility routine you will:

  1. Improve your comfort while playing your favorite sport,
  2. Improve your golf performance
  3. Increase the amount of time and length of time you can play golf.

Check out our video on flexibility for golfers here.

Read more about golf flexibility here. 

Core strength and stability for proper loading and muscle firing in the golf swing

Flexibility is half the battle in pain free golf. The other half is core strength and stability to keep you healthy. Stability is turning on the appropriate muscle groups that we want involved and that should “fire” during movements. We call this a proper kinematic sequence. It is our job to teach the body which muscles to fire at the right time during the golf swing. This allows you to play pain free and dramatically increase your performance.

We always like to start from the ground up when working with stability. When you watch the PGA pros play it’s amazing to see their power that they generate from their legs. It is imperative that we give your legs the proper stability training to ensure the proper kinematic sequence for the rest of the golf swing. As we move up the body, we want proper movement and stability in the glutes and hips, and then the core. If we can initiate proper muscle firing in the legs, to the glutes/hips, and then to the core you will be able to play the game of golf pain free. 

It is very important to focus on training these muscles to fire properly. Simply going through the motions of movements doesn’t fix the problem. Flawless technique, mental focus and proper repetition is how your body will learn to do things right and then continue to do them right.

Check out our video on hip stability for golfers here.

Read more about stability for golfers here.

Focusing on the flexibility, stability and core strength is the key to eliminating pain and improving golf performance. How you go about it is a massive component of how successful you will be. Follow our proven PureForged Method and find out for yourself.